
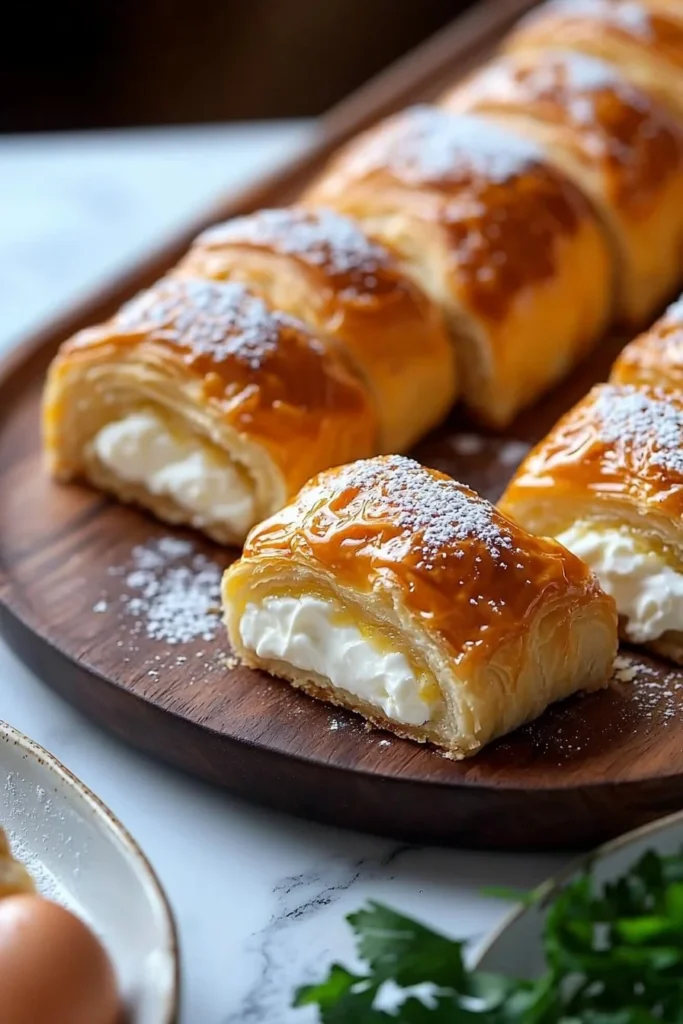
Have you ever tasted something so delightful that it makes your taste buds dance? The King’s Hawaiian Cheesecake Danish is one of those magical creations that have the power to transport you to dessert paradise with its buttery, sweet rolls and creamy, velvety cheesecake filling. Imagine this: a golden, pillowy exterior that gives way to a luscious, smooth center, topped with a burst of your favorite fruit. It’s the perfect treat for family gatherings or cozy winter evenings when you want something sweet but not overly complicated to prepare.
Here’s a fun fact: Hawaiian rolls aren’t just for sliders! Their fluffy sweetness pairs beautifully with rich cheesecake flavors. This makes the King’s Hawaiian Cheesecake Danish not just a dessert but an experience. If you enjoyed my recipe for Chocolate Chip Cookie Bars, you’ll absolutely love whipping this indulgent treat up in no time. Let’s dive into this fantastic recipe that’s sure to impress everyone at your next family gathering!
What is King’s Hawaiian Cheesecake Danish?
So, what exactly is this King’s Hawaiian Cheesecake Danish? Well, it’s essentially a delightful fusion of soft sweet rolls and creamy cheesecake, creating the ultimate combination of textures. You might be wondering where the name comes from. Who thought mixing Hawaiian rolls with cheesecake was a good idea? Perhaps a culinary genius aiming to prove that the way to a man’s heart is through his stomach! It’s an engaging dessert that transforms ordinary sweet rolls into something incredibly luscious and visually appealing. So, gather your ingredients and get ready to wow your loved ones with this easy and fun treat!
Why You’ll Love This King’s Hawaiian Cheesecake Danish
First off, this King’s Hawaiian Cheesecake Danish is the star of any table. The soft, sweet rolls provide a delightful contrast to the creamy, rich filling that will have everyone reaching for another piece. But it doesn’t stop there! Making this sweet treat at home not only saves you money but also allows you to share freshly baked joy with your family. Who wouldn’t love the fragrance of baked sweets wafting through the house?
Plus, the customizable toppings allow you to get creative: think fresh fruits, a drizzle of chocolate, or even a sprinkle of nuts. It’s a little like a cheesecake meets a breakfast pastry crossover! If you’ve ever made a traditional cheesecake, you know it can be time-consuming and involves a bit of finesse. In contrast, this Danish is straightforward and perfect for both beginner bakers and seasoned pros. Prepare to impress your guests—get those rolling pins ready!
How to Make King’s Hawaiian Cheesecake Danish
Quick Overview
Creating your own King’s Hawaiian Cheesecake Danish is a breeze! With its soft texture and luscious filling, this dessert comes together in just about 30 minutes of preparation time. You’ll marvel at how simple ingredients blend together to create such an amazing dish. Let’s check out what you need to make this delightful dessert.
Ingredients
- 1 package King’s Hawaiian sweet rolls (12 rolls)
- 8 oz cream cheese, softened
- 1/2 cup powdered sugar
- 1/2 tsp vanilla extract
- 1/4 cup sour cream
- 1 egg
- 1/4 cup fruit topping (such as pie filling or fresh fruit)
- 1 egg wash (1 egg beaten with 1 tbsp water)
Step-by-Step Instructions
- Prepare the Sweet Rolls: Preheat your oven to 350°F (175°C). While it’s heating, take a sharp knife and gently cut a pocket into the top of each sweet roll, ensuring you don’t cut all the way through.
- Make the Cheesecake Filling: In a mixing bowl, combine the softened cream cheese, powdered sugar, vanilla extract, sour cream, and egg. Use a hand mixer or a whisk to blend until smooth and creamy.
- Fill the Rolls: Using a spoon, carefully scoop a generous amount of the cheesecake mixture into each pocket of the sweet rolls. Don’t be shy—fill them well!
- Add the Fruit Topping: Top each filled roll with your favorite fruit topping, whether it’s cherry pie filling, fresh strawberries, or a mix of berries.
- Egg Wash: Brush the tops of the filled rolls with the egg wash, giving them a beautiful golden color as they bake.
- Bake: Place the filled rolls in a greased baking dish and bake for 20-25 minutes, or until the rolls are golden brown and the filling is set.
- Cool and Serve: Allow the Danish to cool for a few minutes before serving, allowing the flavors to meld beautifully.
Top Tips for Perfecting King’s Hawaiian Cheesecake Danish
- Make it Your Own: Feel free to swap out the fruit topping for whatever sounds delightful or seasonal! Fresh berries, mango, or even a drizzle of caramel can elevate this dessert.
- Watch the Timing: Keep an eye on your Danish as it bakes. Every oven is slightly different, and you want those rolls to be just the right golden brown.
- Room Temperature Ingredients: Make sure your cream cheese is at room temperature to ensure a smooth filling—nobody wants lumps in their cheesecake!
Storing and Reheating Tips
To keep your King’s Hawaiian Cheesecake Danish delightful as ever, store any leftovers in an airtight container in the refrigerator. They’ll last for about 3-4 days. If you’d like, you can even freeze them for up to a month! Just make sure to wrap them tightly. To reheat, pop them in the oven at 350°F (175°C) for about 10 minutes or until warmed through, which will help restore that fresh-out-of-the-oven comfort.
There you go! This simple but incredibly tasty King’s Hawaiian Cheesecake Danish is bound to become a favorite in your household. Gather your family around, and let’s make some sweet memories together!

King’s Hawaiian Cheesecake Danish
Ingredients
Method
- Preheat your oven to 350°F (175°C).
- Gently cut a pocket into the top of each sweet roll, ensuring you don’t cut all the way through.
- In a mixing bowl, combine the softened cream cheese, powdered sugar, vanilla extract, sour cream, and egg. Blend until smooth and creamy.
- Scoop a generous amount of the cheesecake mixture into each pocket of the sweet rolls.
- Top each filled roll with your favorite fruit topping.
- Brush the tops with the egg wash.
- Place the filled rolls in a greased baking dish and bake for 20-25 minutes, or until golden brown.
- Allow the Danish to cool for a few minutes before serving.
Leave a Reply