
Jellycat Birthday Cake
Imagine biting into a moist, fluffy cake that is as delightful as it is charming. The Jellycat Birthday Cake is not just a treat for the taste buds; it’s a celebration on a plate! With its whimsical name inspired by the beloved Jellycat plush toys, this cake combines the essence of childhood joy with the satisfaction of home-baking. Perfect for family gatherings, it embodies a lighthearted spirit, similar in playfulness to my No-Bake Eclair Cake, which is just as simple yet undeniably delicious. It’s all about making memories in the kitchen while indulging in sweet flavors that everyone loves.
What makes this cake extra special is not only its tender crumb and sweet vanilla taste but also its versatility. It’s the kind of cake that encourages creativity: you can decorate it in so many fun ways, adding personalized touches that will bring smiles to everyone’s faces. Whether you’re planning for a fun weekend dessert or just a treat for a chilly evening, this cake will steal the show. You may also find 3 Ingredient Creamy Yogurt Cake useful.
What is Jellycat Birthday Cake?
So, what exactly is the Jellycat Birthday Cake? While the name may spark curiosity, it’s really a cake that captures the joy of special moments. It’s whimsical, colorful, and, most importantly, delicious! Do you ever wonder about the stories behind quirky cake names? This one certainly has a playful twist, appealing to both children and the adults at heart. After all, they say the way to a man’s heart is through his stomach, and this cake will surely win over any dessert lover! So let’s dive into the recipe and make your family gatherings even sweeter.
Why You’ll Love This Jellycat Birthday Cake
There are so many reasons to adore the Jellycat Birthday Cake! First, its signature fluffy texture and sweet vanilla flavor make it a standout dessert at any gathering. The richness of the cake paired with playful toppings can bring a unique flair to your family table, resembling the creativity found in dishes like banana oatmeal pancakes but with a whimsical twist.
In addition to being a treat that everyone will enjoy, baking at home can be a wonderful way to save costs rather than purchasing a cake from a store. With just a handful of ingredients, this cake proves that delicious and affordable desserts can go hand-in-hand. You can easily customize the toppings, making it synonymous with personal celebration while still being easy on the wallet.
How to Make Jellycat Birthday Cake
Quick Overview
The Jellycat Birthday Cake is incredibly easy to whip up, making it perfect even for novice bakers. With its light, airy texture and sweet undertones, this cake brightens any occasion. From prepping your ingredients to savoring the last bite, you’ll find this experience very satisfying. You’ll need about 1 hour to prepare and bake this joyful dessert.
Ingredients
- 2 cups all-purpose flour
- 1 ½ cups sugar
- ½ cup unsalted butter, softened
- 1 cup buttermilk
- 3 large eggs
- 1 tablespoon vanilla extract
- 1 ½ teaspoons baking powder
- 1 teaspoon baking soda
- ½ teaspoon salt
- Frosting (to taste)
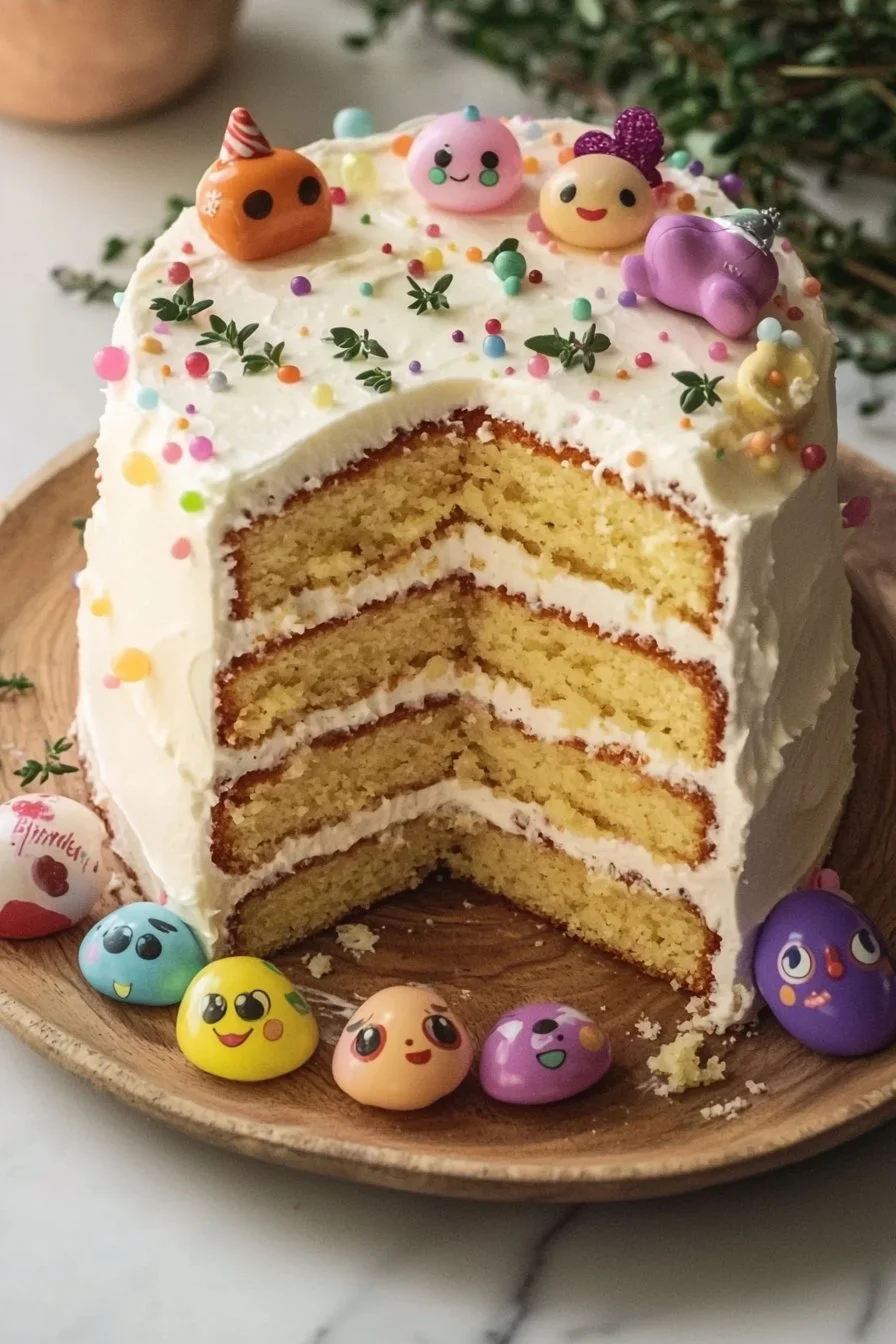
- Decorations (such as Jellycat plush toys)
Step-by-Step Instructions
- Preheat Your Oven: Begin by preheating your oven to 350°F (175°C). This will ensure your cake bakes evenly.
- Prepare Cake Pans: Grease and flour your cake pans to prevent sticking.
- Mix Dry Ingredients: In a mixing bowl, whisk together 2 cups of all-purpose flour, 1 ½ teaspoons baking powder, 1 teaspoon baking soda, and ½ teaspoon salt until well combined.
- Cream Butter and Sugar: In a separate large bowl, beat the softened ½ cup of unsalted butter with 1 ½ cups of sugar until light and fluffy.
- Add Eggs and Vanilla: Add the 3 large eggs, one at a time, mixing well after each addition, along with 1 tablespoon of vanilla extract.
- Combine Mixtures: Alternate adding the dry ingredients and 1 cup of buttermilk to the creamed mixture, starting and ending with the flour mixture. Mix until just combined.
- Pour and Bake: Divide the batter evenly between the prepared pans and bake in the preheated oven for 25-30 minutes, or until a toothpick inserted into the center comes out clean.
- Cool and Frost: Let the cakes cool in the pans for about 10 minutes before transferring them to wire racks to cool completely. Once cool, frost with your favorite frosting and add playful decorations.
Top Tips for Perfecting Jellycat Birthday Cake
To ensure your Jellycat Birthday Cake is always a hit, here are some expert tips:
- Ingredient Substitutions: If you prefer a dairy-free option, use almond milk or a plant-based butter alternative for the recipe. Both work surprisingly well without compromising flavor.
- Timing Matters: Make sure all your ingredients are at room temperature before you start mixing; this will help achieve that perfect texture.
- Avoiding Common Mistakes: Overmixing the batter can lead to a dense cake. Mix just until combined to maintain the joyful fluffiness!
Storing and Reheating Tips
When it comes to storing your Jellycat Birthday Cake, it’s best to keep it in an airtight container in the refrigerator. This helps preserve its freshness for about 4-5 days. If you have leftovers that you want to save for later, consider freezing slices. Just wrap them securely in plastic wrap and store them in an airtight container. To reheat, allow the slices to thaw in the refrigerator, then gently warm them in the microwave for a few seconds, ensuring they retain their delightful texture.
In summary, the Jellycat Birthday Cake is a delightful dessert that combines ease of baking with the joy of personal celebration. Its fluffy texture and sweet flavor are sure to brighten up any family gathering. If you’re looking for additional cake inspiration, consider checking out the fun offerings from Jellycat, like the Amuseables Birthday Cake, to add a whimsical touch to your dessert table!

Jellycat Birthday Cake
Ingredients
Method
- Preheat your oven to 350°F (175°C).
- Grease and flour your cake pans.
- In a mixing bowl, whisk together the all-purpose flour, baking powder, baking soda, and salt until well combined.
- In a separate large bowl, beat the softened unsalted butter with the sugar until light and fluffy.
- Add the eggs one at a time, mixing well after each addition, along with vanilla extract.
- Alternate adding the dry ingredients and buttermilk to the creamed mixture, starting and ending with the flour mixture. Mix until just combined.
- Divide the batter evenly between the prepared pans and bake in the preheated oven for 25-30 minutes, or until a toothpick inserted into the center comes out clean.
- Let the cakes cool in the pans for about 10 minutes before transferring them to wire racks to cool completely.
- Once cool, frost with your favorite frosting and add playful decorations.
Leave a Reply