
Who doesn’t love a sweet, delightful cake pop that’s both visually appealing and delicious? Cake pops are the perfect treat for family gatherings or cozy evenings at home. With their crispy outer shell and soft, gooey center, they offer the best of both worlds. Fun fact: Cake pops originally emerged from the need to use leftover cake. Almost like a culinary magic trick, you can transform a simple cake into a fun, portable dessert! Unlike traditional cakes that may require careful slicing and serving, cake pops make it easy to share sweetness in a single bite.
In our recipe, we keep it simple, making it perfect for active families. Whether you’re hosting a get-together or simply enjoying a winter evening with loved ones, these Easy Cake Pops are guaranteed to bring smiles. If you enjoyed our classic chocolate chip cookies or dreamy panna cotta, you’re going to love these. They’re simple, satisfying, and simply addictive!
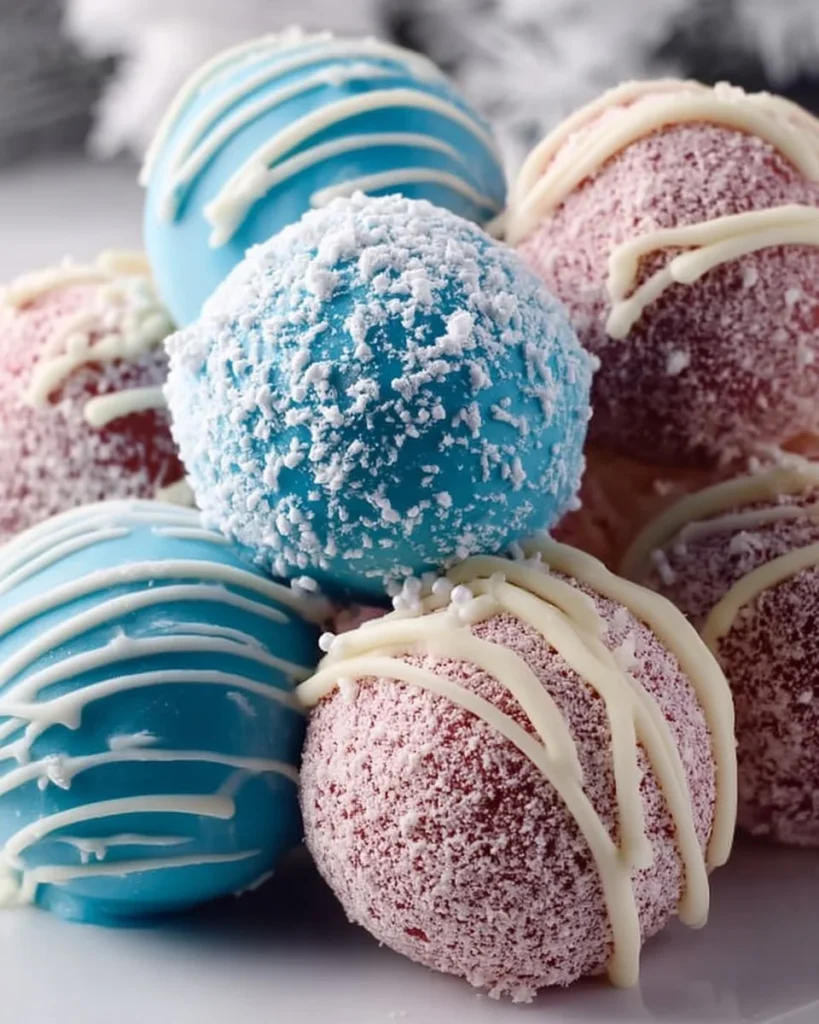
What is Easy Cake Pops?
So, what’s the deal with the name “cake pop”? Is it because they pop in your mouth like confetti? Or maybe it’s because they’re so cute that you can’t help but pop one after another? Who knows! The whimsical nature of cake pops makes them a favorite among both kids and adults. You’ve heard it before: “the way to a man’s heart is through his stomach!” And these delightful bites are sure to win over anyone’s heart, one sweet morsel at a time! Dive into this recipe to discover how easy it really is to make your own delicious cake pops.
Why You’ll Love This Easy Cake Pops
Flavor Explosion: Prepare to embark on a flavor adventure! Homemade Easy Cake Pops allow you to choose any cake flavor and frosting you desire, making every batch unique. Whether you opt for zesty lemon cake or rich chocolate fudge, the outcome is always a delight.
Cost-Saving Benefits of Cooking at Home: Why splurge on pricey dessert shops when you can whip up a batch yourself at home? Making cake pops is not only economical but also a fun family bonding experience. Everyone can get involved in creating their own flavors and decorations!
Topping Delight: The magical moment when you dip each cake ball into melting chocolate and sprinkle it with colorful toppings is exciting. Imagine that first bite: a crunchy exterior meets a moist and flavorful center. You’ll never look at cake the same way again! So grab that baking apron and let’s create some delicious memories!
How to Make Easy Cake Pops
Quick Overview
Preparing Easy Cake Pops is a breeze, making this treat perfect for any skill level. In just about 45-60 minutes, you can turn a simple cake and frosting into a delightful dessert. Expect a soft, cake-like center enveloped in a rich chocolate (or candy melt) shell. It’s a texture and flavor combination that will leave everyone craving more!
Ingredients
- 1 cake (any flavor)
- 1 cup frosting (any flavor)
- Chocolate coating (or candy melts)
- Cake pop sticks
- Sprinkles (optional)
Step-by-Step Instructions
- Bake the Cake: Start by baking your chosen cake according to the package instructions or your recipe. Let it cool completely.
- Crumble the Cake: Once the cake is cool, crumble it into a large bowl. You want it to resemble fine crumbs, but not dust!
- Add Frosting: Slowly mix in the frosting until the cake crumbs are well-combined and form a dough-like consistency. You can start with half a cup and add more if needed.
- Shape the Pops: With clean hands, take about a tablespoon of the mixture and roll it into a ball. Place each ball on a baking sheet lined with parchment paper. Repeat until all the mixture is used.
- Chill: Place the tray in the refrigerator for about 30 minutes to help them firm up.
- Prepare Coating: Melt your chocolate or candy melts in a microwave-safe bowl in 30-second intervals, stirring in between until fully melted.
- Dip Sticks: Dip the end of each cake pop stick into the melted chocolate before inserting it into a cake ball. This will help it stay put!
- Coat the Cake Pops: Once the sticks are in, dip each cake ball into the melted chocolate, allowing excess to drip off. If desired, add sprinkles while the coating is still wet.
- Set: Place the finished cake pops upright in a styrofoam block, or return them to the parchment-lined sheet. Allow them to set until the coating is firm.
- Enjoy: Now, your delightful Easy Cake Pops are ready! Serve them at your next family gathering or enjoy them at home.
Top Tips for Perfecting Easy Cake Pops
- Substitutions: Feel free to use gluten-free cake or dairy-free frosting for dietary preferences!
- Timing: Don’t rush the chilling process; it helps keep your pops sturdy.
- Common Mistakes: Ensure your cake and frosting mixture isn’t too wet or too dry. Adjust the frosting as needed to achieve the perfect cake pop dough consistency.
Storing and Reheating Tips
Store your Easy Cake Pops in an airtight container at room temperature for up to 3 days, or refrigerate them for up to a week. If you want to keep them longer, they can be frozen for up to two months. To enjoy them after freezing, simply let them thaw in the refrigerator and savor their delightful flavor, maintaining that tasty texture.
Next time you’re looking for a fun and delicious treat, remember this Easy Cake Pops recipe. Not only will you impress your family and friends, but you’ll also create lasting memories with each bite. Happy baking!

Frequently Asked Questions
Can I use different flavors of cake?
Absolutely! The beauty of Easy Cake Pops is their versatility. Feel free to experiment with any cake flavors you like!
How do I make cake pops without sticks?
If you prefer, you can skip the sticks entirely and serve them as cake balls in cups or on a platter. Just adjust the dipping method a bit!
Can kids help with this recipe?
Definitely! Making cake pops is a fun activity for all ages. Little hands can help with rolling the cake balls and decorating them!
Now that you have the complete guide to creating Easy Cake Pops, it’s time to get started. Gather your ingredients and unleash your creativity in the kitchen! Enjoy crafting these delightful treats while making memories that will last a lifetime!
Easy Cake Pops
Ingredients
Method
- Bake the Cake: Start by baking your chosen cake according to the package instructions or your recipe. Let it cool completely.
- Crumble the Cake: Once the cake is cool, crumble it into a large bowl. You want it to resemble fine crumbs, but not dust!
- Add Frosting: Slowly mix in the frosting until the cake crumbs are well-combined and form a dough-like consistency. You can start with half a cup and add more if needed.
- Shape the Pops: With clean hands, take about a tablespoon of the mixture and roll it into a ball. Place each ball on a baking sheet lined with parchment paper. Repeat until all the mixture is used.
- Chill: Place the tray in the refrigerator for about 30 minutes to help them firm up.
- Prepare Coating: Melt your chocolate or candy melts in a microwave-safe bowl in 30-second intervals, stirring in between until fully melted.
- Dip Sticks: Dip the end of each cake pop stick into the melted chocolate before inserting it into a cake ball. This will help it stay put!
- Coat the Cake Pops: Once the sticks are in, dip each cake ball into the melted chocolate, allowing excess to drip off. If desired, add sprinkles while the coating is still wet.
- Set: Place the finished cake pops upright in a styrofoam block, or return them to the parchment-lined sheet. Allow them to set until the coating is firm.
- Enjoy: Now, your delightful Easy Cake Pops are ready! Serve them at your next family gathering or enjoy them at home.
Leave a Reply