
Watercolor Cake: An Edible Masterpiece
If you’re looking to impress guests at your next family gathering, then the Watercolor Cake is a delightful option that is as beautiful as it is delicious. Imagine a moist, fluffy cake adorned with swirls of vibrant colors, reminiscent of an artist’s color palette. This cake isn’t just a treat for the taste buds; it’s a feast for the eyes! I remember the first time I made it—my little brother was captivated, insisting it looked “too pretty to eat.” And honestly, who can blame him? This cake stands out just like our popular recipe for Vanilla Bean Cupcakes, which also balances flavor and appearance effortlessly.
What makes the Watercolor Cake special is its simplicity. With a handful of everyday ingredients, you can create a stunning dessert that transcends ordinary offerings. It’s perfect for all occasions—be it a cozy winter evening with family or a fun get-together with friends. Trust me when I say that the way to a man’s heart is through his stomach, and this cake may just be the golden ticket!
What is Watercolor Cake?
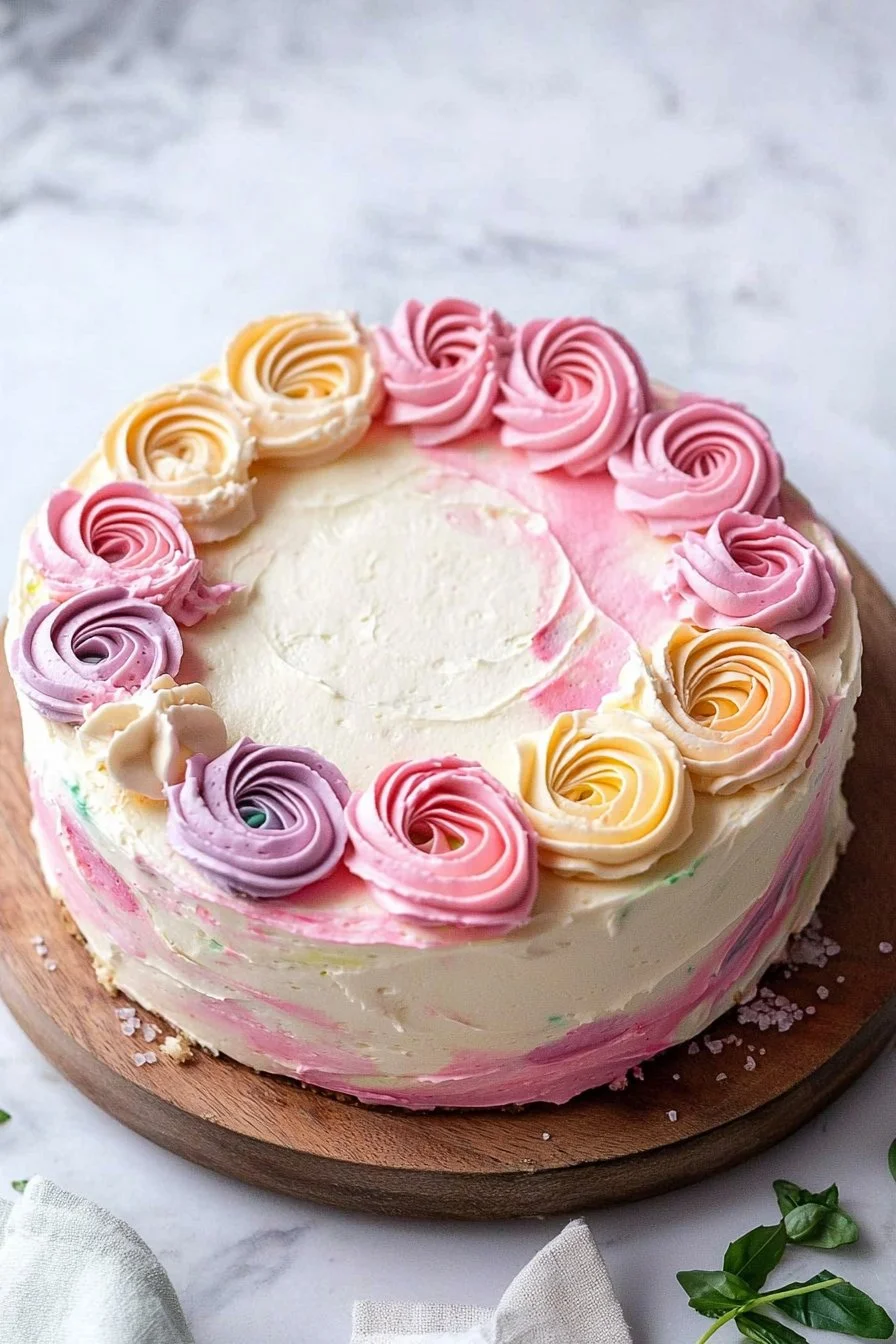
Ah, Watercolor Cake—an intriguing name for a truly delightful dessert! What’s in a name, you ask? Is it the mesmerizing swirl of colors or the sweet taste that dances on your palate? Maybe it’s both! Picture this: a fluffy cake layered with smooth buttercream frosting, then adorned with radiant hues. Sounds dreamy, right? It almost gives off a splatter-paint vibe that appears difficult to make, yet it’s surprisingly easy!
Baking this cake is like walking through an art gallery of flavors; colors come together to create a beautiful masterpiece, making your kitchen feel like a creative studio. So why not channel your inner artist and try crafting this delicious creation?
Why You’ll Love This Watercolor Cake
A Visual and Flavorful Showstopper
What truly sets the Watercolor Cake apart is its eye-catching presentation. This cake is not just a dessert; it’s a centerpiece that sparks conversation! With its fluffy texture and light sweetness, each bite is pure indulgence.
Cost-Saving Benefits of Cooking at Home
Who said gourmet desserts have to break the bank? Making your own Watercolor Cake allows you to control the cost while having a spectacular dessert that can serve a crowd. Purchasing a similar cake from a bakery could certainly dent your wallet—but when you make it at home, you’re saving not just money but also creating precious memories with loved ones.
Flavorful Toppings
Imagine serving a slice of this cake topped with a dollop of whipped cream or fresh fruit; it elevates the experience to another level! Comparing it to a traditional sponge cake, the Watercolor Cake not only stands out in appearance but also in its ability to combine flavors harmoniously.
Why wait? Put on your apron, and let’s dive into the delightful world of baking!
How to Make Watercolor Cake
Quick Overview
This Watercolor Cake is incredibly satisfying to make, both in aromas that fill your kitchen and the delightful textures that await! With fluffy layers and swirls of colorful frosting, it takes roughly 30 minutes to prepare and about 30 minutes to bake.
Ingredients
- 2 cups all-purpose flour
- 1 ½ cups granulated sugar
- ½ cup unsalted butter, softened
- 1 cup milk
- 3 ½ teaspoons baking powder
- 1 teaspoon vanilla extract
- ½ teaspoon salt
- Gel food coloring (various colors)
- Buttercream frosting for decoration
Gather all ingredients before starting to ensure a smooth baking experience.
Step-by-Step Instructions
- Preheat the Oven: Preheat your oven to 350°F (175°C) and grease and flour two 9-inch round cake pans.
- Mix Dry Ingredients: In a large mixing bowl, whisk together the flour, baking powder, and salt. Set aside.
- Cream Butter and Sugar: In another bowl, cream the softened butter and granulated sugar until light and fluffy. This usually takes about 4-5 minutes.
- Add Eggs and Vanilla: Add in the vanilla extract and eggs one at a time, mixing well after each addition.
- Combine Mixtures: Gradually alternate between adding the dry mixture and milk to the wet ingredients, mixing until just combined. Do not overmix!
- Color Your Batter: Divide the batter equally into smaller bowls. Add a few drops of gel food coloring to each bowl, mixing until you achieve your desired colors.
- Layer the Batter: Pour dollops of colored batter into the prepared pans, alternating the colors until all are used—feel free to get creative!
- Bake: Place in the preheated oven and bake for 25-30 minutes or until a toothpick inserted into the center comes out clean.
- Cool the Cakes: Allow the cakes to cool in the pans for 10 minutes before transferring them to wire racks to cool completely.
- Frosting: Once cooled, frost with buttercream frosting, creating a watercolor effect using a palette knife or spatula.
Top Tips for Perfecting Watercolor Cake
- Ingredient Substitutions: You can replace the all-purpose flour with a gluten-free blend if needed, ensuring everyone can enjoy this dessert.
- Timing: When mixing the batter, the key is to combine just until the ingredients are moistened. Overmixing could result in a dense cake.
- Avoiding Common Mistakes: Ensure your butter is softened but not melted to achieve the best texture. Also, don’t skip the baking powder—it’s essential for that light, fluffy cake!
Storing and Reheating Tips
To store your Watercolor Cake, keep it in an airtight container at room temperature for up to 2-3 days. If you need a longer shelf life, you can refrigerate it for about a week. For freezing, wrap slices in plastic wrap or foil and store in a freezer-safe container; it can last up to three months.
When you’re ready to enjoy the cake again, simply thaw it in the refrigerator overnight and bring it to room temperature before serving to maintain that delicious, moist texture.
Conclusion
Now that you have the complete guide to making an unforgettable Watercolor Cake, why not give it a whirl? This cake is simple to make, visually appealing, and bursting with flavor! Share your experience with friends and family, and let them marvel at your baking prowess. Whether you’re a seasoned baker or a kitchen novice, you can create something beautiful that will delight everyone at your table. Happy baking!
Frequently Asked Questions
Feel free to ask any questions you might have while making your cake or share your creative renditions using the comments below. We’d love to hear about your colorful baking adventures!

Watercolor Cake
Ingredients
Method
- Preheat your oven to 350°F (175°C) and grease and flour two 9-inch round cake pans.
- In a large mixing bowl, whisk together the flour, baking powder, and salt. Set aside.
- In another bowl, cream the softened butter and granulated sugar until light and fluffy. This usually takes about 4-5 minutes.
- Add in the vanilla extract and eggs one at a time, mixing well after each addition.
- Gradually alternate between adding the dry mixture and milk to the wet ingredients, mixing until just combined. Do not overmix!
- Divide the batter equally into smaller bowls. Add a few drops of gel food coloring to each bowl, mixing until you achieve your desired colors.
- Pour dollops of colored batter into the prepared pans, alternating the colors until all are used.
- Place in the preheated oven and bake for 25-30 minutes or until a toothpick inserted into the center comes out clean.
- Allow the cakes to cool in the pans for 10 minutes before transferring them to wire racks to cool completely.
- Once cooled, frost with buttercream frosting, creating a watercolor effect using a palette knife or spatula.
Leave a Reply