
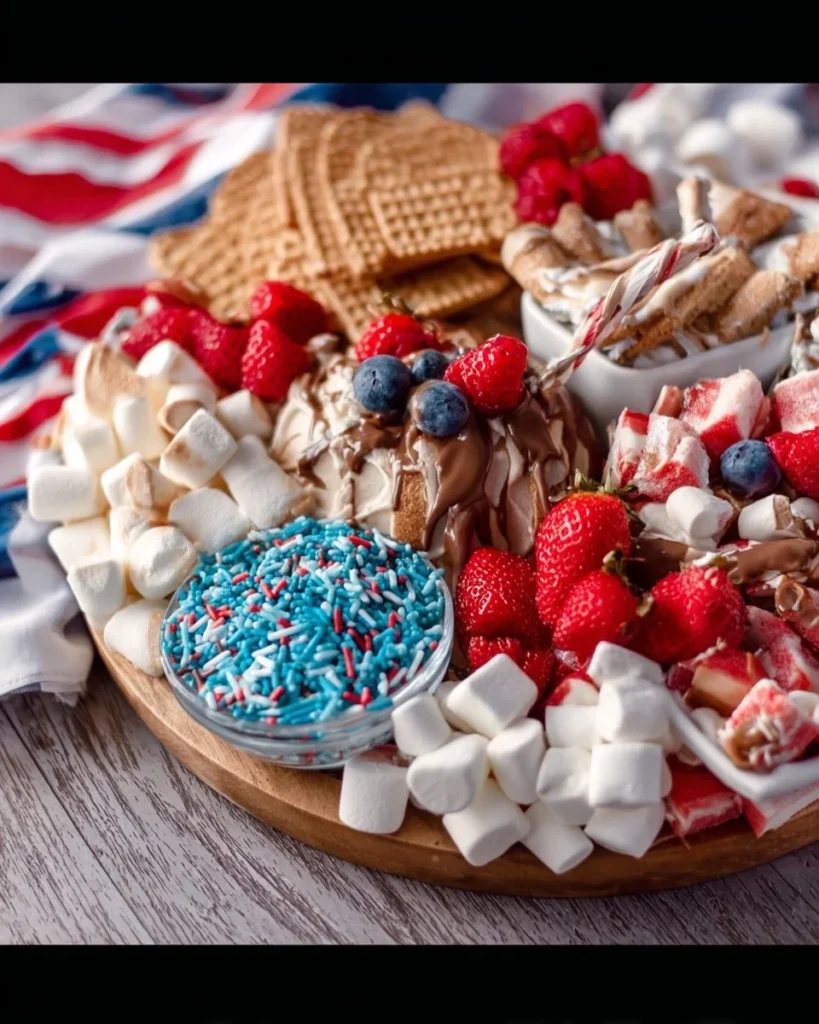
Looking for a delightful way to satisfy your sweet tooth while impressing family and friends? Look no further than the Sweet Dessert Board! This vibrant display of treats will not only entice your taste buds but also elevate any gathering into a festive occasion. Imagine diving into a platter filled with an assortment of decadent chocolates, cookies, and fresh fruits; it’s a feast for both the eyes and the palate!
Growing up, my family often enjoyed “snack platters” during cozy winter evenings. I remember one particularly chilly night when we piled a board high with treats, and it quickly became our go-to for family movie nights. Its simplicity makes it extremely special; you just need to gather your ingredients and let them shine! If you loved our Chocolate-Covered Strawberries recipe, you’re going to adore this Sweet Dessert Board. The best part? It’s perfect for everyone and easy to put together, making it a fabulous choice for all ages.
What is a Sweet Dessert Board?
So, what exactly is a Sweet Dessert Board? Well, it’s not just any dessert; it’s a masterpiece of various sweet delights spread out on a large board. Imagine what happens when a cookie lover, a chocolate fanatic, and a fruit enthusiast come together for a culinary party! There’s something incredibly fun—and a bit whimsical—about the concept. Why “board,” you might ask? Isn’t it more like a platter or a feast? The way to a man’s heart is through his stomach, and this board definitely wins hearts. All you need to do is choose your favorites, arrange them beautifully, and watch as everyone dives in! Ready to create your own?
Why You’ll Love This Sweet Dessert Board
What makes the Sweet Dessert Board so amazing? First and foremost, it’s an indulgent dessert extravaganza! You can highlight your favorite treats—decadent chocolates, chewy cookies, and juicy fresh fruits—that all come together to create a heavenly experience.
One of the best aspects of making your own dessert board is the cost-saving benefits. Buying individual treats in bulk is often cheaper than purchasing pre-packaged items. Plus, you can customize it according to your family’s preferences and dietary restrictions, ensuring that everyone has something to enjoy.
Let’s not forget the variety of flavorful toppings! Whether you opt for a rich chocolate sauce or a light whipped cream, each element adds a delightful layer to the dessert. It’s like hosting a mini dessert buffet at home! So, gather your loved ones and get ready to create a Sweet Dessert Board they won’t forget.
How to Make a Sweet Dessert Board
Quick Overview
Creating a Sweet Dessert Board is not just easy; it’s an incredibly satisfying experience! With a colorful array of textures—crunchy, chewy, and creamy—you’ll be delighted with every bite. The preparation time is quick, taking roughly 20-30 minutes, depending on how elaborate you want your board to be. It’s the perfect activity for a family gathering or an impromptu get-together with friends.
Ingredients for Sweet Dessert Board
- Assorted chocolates (Milk, dark, and white; about 8 ounces total)
- Cookies (Your choice; 1 dozen, homemade or store-bought)
- Brownies (Cut into bite-sized pieces; about 8 ounces)
- Fruits (1 cup strawberries, 1 cup grapes)
- Marshmallows (8 ounces)
- Nuts (Almonds, cashews; 1 cup, salted or unsalted)
- Whipped cream (1 cup)
- Dips (1/2 cup chocolate sauce, 1/2 cup caramel sauce)
Feel free to mix and match or customize according to personal preferences. There is no right or wrong way to create your Sweet Dessert Board!
Step-by-Step Instructions
- Prepare Your Ingredients: Start by gathering all your ingredients. If you’ve opted for homemade brownies or cookies, make sure they have cooled completely before cutting them into bite-sized pieces.
- Choose Your Board or Platter: Select a large, flat serving board or platter. Wooden boards add a rustic touch, while white platters can make the colors of the treats pop!
- Arrange the Base: Begin by placing larger items, like brownies and cookies, in clusters on the board.
- Fill with Fruits: Next, add fresh fruits strategically around the board. They add not only color but also a refreshing contrast to the rich sweets.
- Scatter Chocolates and Nuts: Fill in the gaps with assorted chocolates and nuts. Spread these around to create a visually appealing balance.
- Include Marshmallows: Place marshmallows in a small bowl or scattered slightly to encourage guests to grab them with their hands.
- Set Up Dips: Finally, add your chocolate and caramel sauces in small bowls, neatly positioned on the board for easy access. You can place a spoon in each dip for serving.
- Top with Whipped Cream: Serve whipped cream in a separate bowl, or dollop it on the side for easy scooping.
Invite everyone to dig in! Watch as your Sweet Dessert Board becomes the highlight of the night.
Top Tips for Perfecting Sweet Dessert Board
- Substitutions: Feel free to swap out any of the main ingredients with Halal-friendly options—use vegan chocolates for a dairy-free alternative or gluten-free cookies for those with dietary restrictions.
- Timing: If you’re short on time, opt for store-bought treats that can still deliver great flavor. Look for seasonal items, which can be exciting additions.
- Avoid Common Mistakes: Don’t overcrowd the board; leave some space to allow guests to pick up items without knocking everything over. Also, ensure items with different textures—hard candies, chewy cookies, and fresh fruits—are spaced out for variety.
Storing and Reheating Tips
Storing leftovers from your Sweet Dessert Board is simple. If you find yourself with treats leftover (which may be rare!), cover the board with plastic wrap and refrigerate. Most items can last for 2-3 days, although fruits may start to lose their freshness.
For reheating, it’s best to eat items like brownies at room temperature. If necessary, you can warm them up in the microwave for about 10-15 seconds. Avoid reheating items like whipped cream or fresh fruits. Instead, keep them separate until you’re ready to serve again.
Final Thoughts
Now that you have all the tips and tricks to create your Sweet Dessert Board, it’s time to gather your ingredients and make this delightful treat! Your family and friends are sure to be enamored by the vibrant flavors and beautiful presentation. Share your gorgeous board with us, and happy sweet snacking!

FAQ
Can I customize my dessert board?
Absolutely! Swap in your favorite sweets or seasonal fruits as you like.
How long does it take to prepare?
Typically, you can whip up a Sweet Dessert Board in just 20-30 minutes!
Are there any suitable alternatives for chocolate?
Definitely! You can use carob chips or yogurt-covered snacks for a fun change.
What can I pair with the dips?
All kinds of treats work well with dips; feel free to experiment!
Sweet Dessert Board
Ingredients
Method
- Start by gathering all your ingredients. If you’ve opted for homemade brownies or cookies, make sure they have cooled completely before cutting them into bite-sized pieces.
- Select a large, flat serving board or platter.
- Begin by placing larger items, like brownies and cookies, in clusters on the board.
- Next, strategically add fresh fruits around the board.
- Fill in the gaps with assorted chocolates and nuts for a visually appealing balance.
- Place marshmallows in a bowl or scatter them slightly.
- Finally, add your chocolate and caramel sauces in small bowls on the board for easy access.
- Serve whipped cream on the side or dollop it for easy scooping.
- Invite everyone to dig in and enjoy your Sweet Dessert Board!
Leave a Reply