
Oreo Cookies: A Delightful Treat for Everyone
Who can resist the iconic crunch of an Oreo cookie? The perfect combination of crunchy chocolate wafers encasing a creamy filling has made these delightful treats a beloved classic. Whether enjoyed on their own or incorporated into a decadent dessert, Oreo cookies bring joy to people of all ages. Here’s a fun tidbit—did you know that Oreos were first introduced in 1912 and have since become one of the most popular cookies in America? These creamy delights are perfect for family gatherings, cozy winter evenings, or even as a secret snack during movie marathons! If you’re a fan of easy dessert recipes, you’ll enjoy our version of Chocolate Chip Cookies, which shares that same beloved simplicity but offers a different flavor profile. Trust me, these treats are just as irresistible!
What is Oreo Cookies?
Oreo cookies, with their rich chocolate exterior and creamy interiors, are synonymous with deliciousness. But have you ever pondered how they got their quirky name? I like to imagine it was named after a charming little creature called an “Oreo,” prancing around all day working on the cookie recipe. Funny, right? They say that “the way to a man’s heart is through his stomach,” and folks, these cookies might just be the ultimate shortcut! Whether dipped in milk, crushed atop ice cream, or simply savored straight from the package, these cookies are always a hit. So, why not grab a pack and experience the love at first bite? Let’s get baking!
Why You’ll Love This Oreo Cookies
Oreo cookies are not only a delicious treat but also a cost-effective option for satisfying sweet cravings! When you make these at home, you can indulge in a rich, creamy filling that’s even more satisfying than store-bought. Each bite provides a sensory delight of crunch and sweetness, enhanced by the various toppings you can experiment with, like sprinkles or coconut flakes. If you’ve ever enjoyed a classic ice cream sandwich, you’ll find these cookies deliver a similar satisfaction! Give in to your sweet tooth—grab the ingredients and whip up your own Oreo cookies for a delightful experience!
How to Make Oreo Cookies
Quick Overview
The beauty of making Oreo cookies lies in its simplicity. With an easy preparation method, you can create a delicious, satisfying snack in no time. The delightful contrast of crunchy cookie and creamy filling truly makes these cookies a hit. Preparing these cookies takes about 20 minutes, plus some time for chilling and setting. Let’s dive into the specific ingredients that you’ll need!
Ingredients
- 1 package Oreo cookies (approx. 14.3 oz)
- 1 package cream cheese (8 oz)
- Chocolate for dipping (about 1-2 cups, depending on preference)
Step-by-Step Instructions
- Crush the Cookies: Start by placing the Oreo cookies in a large mixing bowl. Use a food processor or a rolling pin to crush them into fine crumbs. A little crunch is still okay, so don’t stress if you have some larger chunks!
- Mix with Cream Cheese: Next, add the softened cream cheese to the crushed cookies. Using a spatula or your hands, combine the two until the mixture is well incorporated. It should be thick and sticky, perfect for shaping!
- Shape into Balls: Take small portions of the cookie mixture and roll them into bite-sized balls, about one inch in diameter. Place them on a baking sheet covered with parchment paper.
- Chill: Place the cookie balls in the refrigerator for about 15-30 minutes until they’re firm. This helps maintain their shape during the dipping process.
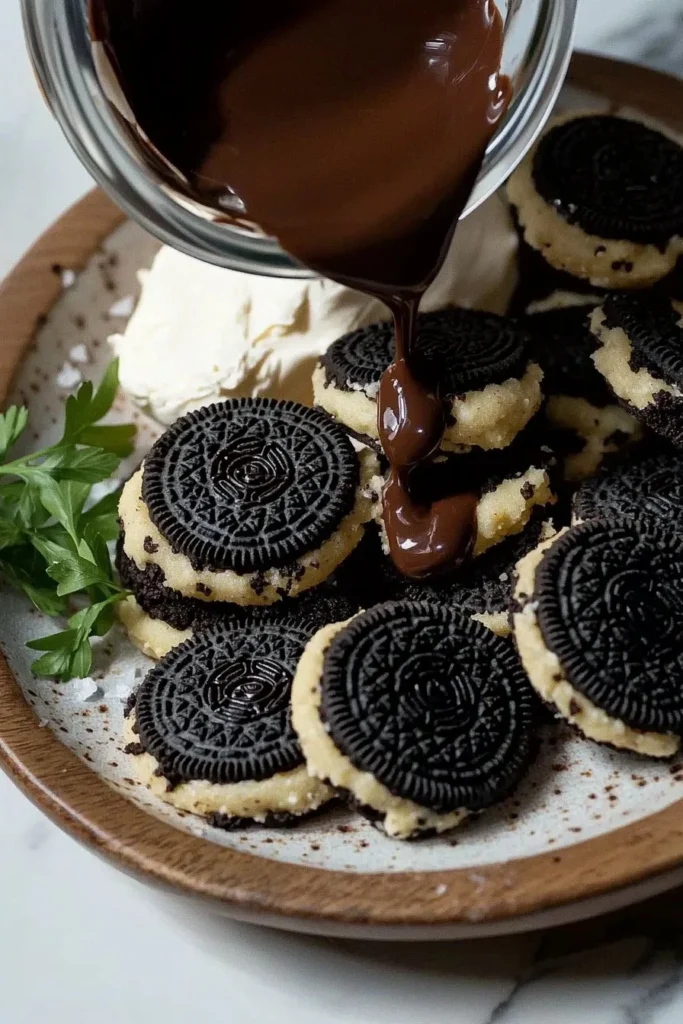
- Melt the Chocolate: While the cookies are chilling, melt your desired chocolate in a microwave-safe bowl, stirring every 30 seconds until smooth.
- Dip the Cookie Balls: Remove the cookie balls from the fridge and dip them into the melted chocolate, fully coating each ball. Use a fork to lift them out, allowing any excess chocolate to drip off.
- Set the Coating: Return the dipped cookie balls to the parchment-lined baking sheet. Optionally, you can add sprinkles or toppings before the chocolate hardens.
- Cool and Enjoy: Place them back in the refrigerator for about 30 minutes to help the chocolate set. Once hardened, your Oreo cookies are ready to serve and enjoy!
Top Tips for Perfecting Oreo Cookies
- Substitutions: If you’re looking to switch it up, consider using different flavored cream cheese—like vanilla or strawberry—for a fun twist!
- Timing: Ensure your chocolate is not overheated when melting, as it can seize. Always melt slowly!
- Prevent Common Mistakes: Make sure Oreo crumbs are fine enough to mix well with the cream cheese. If they’re too chunky, forming balls may become challenging!
Storing and Reheating Tips
To keep your Oreo cookies fresh, store them in an airtight container in the refrigerator. They can last up to a week, though I doubt they’ll stick around that long! If you want to keep them longer, you can freeze them—just place them in a single layer on a baking sheet to freeze them solid, then transfer to a freezer-safe container for up to three months. When you’re ready to enjoy, just allow them to thaw in the fridge for a few hours to maintain the best texture and taste.
Now that you’re equipped with this easy recipe for Oreo cookies, you can make your family gatherings even sweeter. Enjoy the fun and delight these cookies bring to every occasion!
Oreo Cookies
Ingredients
Method
- Crush the Oreo cookies in a large mixing bowl until you have fine crumbs, leaving some chunks if desired.
- Mix the softened cream cheese with the crushed cookies until well incorporated, creating a thick and sticky mixture.
- Shape the mixture into bite-sized balls, about one inch in diameter, and place them on a parchment-lined baking sheet.
- Refrigerate the cookie balls for 15-30 minutes until they are firm.
- Melt your chosen chocolate in a microwave-safe bowl, stirring every 30 seconds until smooth.
- Dip the chilled cookie balls into the melted chocolate, ensuring they are fully coated.
- Return the dipped cookie balls to the baking sheet and optionally add sprinkles before the chocolate hardens.
- Refrigerate again for about 30 minutes to set the chocolate. Serve and enjoy!
Leave a Reply