
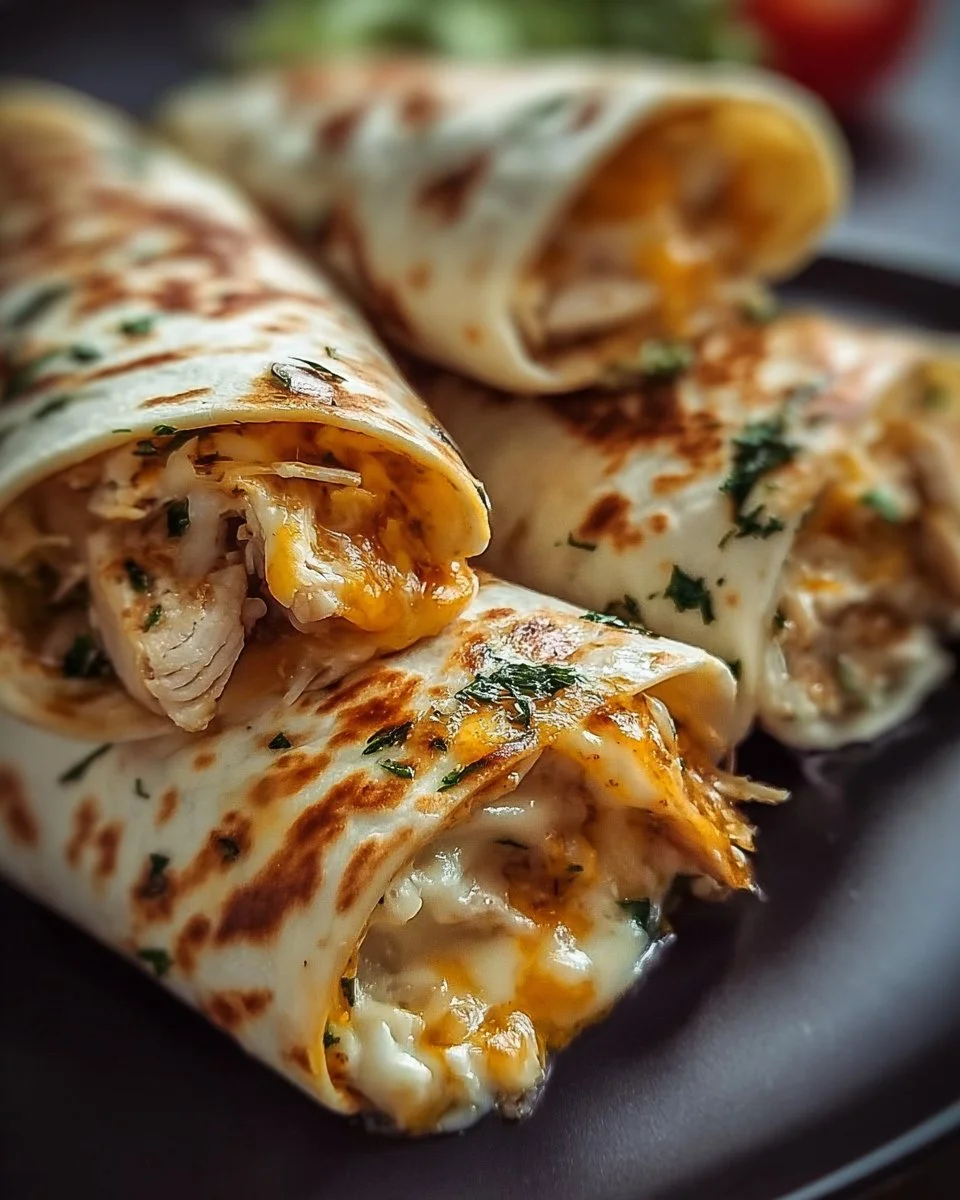
Does anything sound more alluring than Ooey-Gooey Cheesy Garlic Chicken Wraps? With their crispy edges, savory fillings, and irresistible cheesy goodness, these wraps have become my go-to dish for family gatherings and cozy nights in. The first time I made them, my entire family devoured them in mere minutes, leaving me wondering if I should make a second batch! The beauty of these wraps lies in their simplicity and flavor, much like my beloved Mediterranean Chicken Skewers. If you’re looking to impress your loved ones with minimal effort, this delightful recipe is here to save the day.
Cooking is not just about feeding our bodies but also whipping up joyous memories in the kitchen. Picture this: sizzles of garlic in the pan, the aroma filling your home, followed by the moment you take that first, cheesy bite. You cannot resist smiling, right? Let’s roll up our sleeves, dive into this scrumptious adventure, and find out how to make the best Ooey-Gooey Cheesy Garlic Chicken Wraps ever!
 What is Ooey-Gooey Cheesy Garlic Chicken Wraps?
Now, you might be thinking, “Why such a whimsical name?” Honestly, I’m convinced it’s because these wraps encapsulate what every soul dreams of in comfort food: gooey cheese, garlicky goodness, and tender chicken wrapped in a delightful tortilla. And if you’ve ever heard the saying, “the way to a man’s heart is through his stomach,” you’ll know that these wraps are a surefire hit with anyone! Just imagine sharing this dish with your family after a long day – it’s a guaranteed way to create smiles all around. So, roll up your sleeves, and let’s indulge together!
Why You’ll Love This Ooey-Gooey Cheesy Garlic Chicken Wraps
Main Dish Highlight
One of the key reasons you’ll fall in love with Ooey-Gooey Cheesy Garlic Chicken Wraps is their versatility. These wraps serve as the perfect main dish, allowing you to incorporate your favorite flavor-packed ingredients.
Cost-Saving Benefits
By making this dish at home instead of ordering takeout – a costly option that often leads to disappointment – you’ll save money while indulging in a mouth-watering experience. Grab a few ingredients, and you’ll be treating yourself and your family to a satisfying, budget-friendly meal that truly rivals restaurant fare.
Flavorful Toppings
The options for topping your wraps are endless! Crisp lettuce, juicy tomatoes, and sautéed onions can elevate your wraps to new heights. They offer an explosion of flavors and textures, making every bite a delightful adventure.
So gather your family, and let’s make some memories while cooking these cheesy wraps together!
How to Make Ooey-Gooey Cheesy Garlic Chicken Wraps
Quick Overview: Making Ooey-Gooey Cheesy Garlic Chicken Wraps is a cinch! This dish is perfect for busy weeknights or family gatherings. With just 30 minutes of prep time, you’ll enjoy the perfect blend of crunchy, creamy, and savory in each bite.
Key Ingredients for Ooey-Gooey Cheesy Garlic Chicken Wraps
To create these delicious wraps, you’ll need the following ingredients:
- 2 cups cooked chicken, shredded or diced
- 1 cup shredded mozzarella cheese
- 1 cup shredded cheddar cheese
- 4 tablespoons garlic, minced
- 4 large flour tortillas (ensure they’re Halal-certified)
- 2 tablespoons olive oil (or melted butter)
- 1 teaspoon paprika
- Salt and pepper to taste
- Fresh parsley, chopped (optional for garnish)
Step-by-Step Instructions
Here’s how to prepare your Ooey-Gooey Cheesy Garlic Chicken Wraps:
- Preheat Your Oven: Begin by preheating your oven to 375°F (190°C).
- Prepare the Filling: In a large mixing bowl, combine the cooked chicken, mozzarella cheese, cheddar cheese, minced garlic, paprika, salt, and pepper. Stir until all ingredients are evenly mixed.
- Assemble the Wraps: Lay one tortilla flat on a clean surface. Spoon a generous amount of the chicken and cheese mixture onto the center of the tortilla. Fold in the edges and roll it tightly, securing the filling inside.
- Brush and Bake: Place the wrapped tortilla seam-side down on a baking sheet. Brush the tops with olive oil or melted butter for an extra crispy finish. Bake for about 20-25 minutes, or until the wraps are golden brown and cheese is melted.
- Serve: Once cooked, remove the wraps from the oven and let them cool for a few minutes. Serve with your favorite dipping sauces like sour cream or salsa.
Top Tips for Perfecting Ooey-Gooey Cheesy Garlic Chicken Wraps
- Substitutions: If chicken isn’t your favorite, feel free to switch it out for turkey or even chickpeas for a vegetarian option! Use Halal-certified products only.
- Timing: Ensure your chicken is thoroughly cooked before mixing it with the cheese to enhance the flavor.
- Avoiding Mistakes: Don’t overfill your wraps; it may be tempting, but they’ll be easier to handle and cook evenly if you keep the filling moderate.
Storing and Reheating Tips
To store your Ooey-Gooey Cheesy Garlic Chicken Wraps, place them in an airtight container in the refrigerator where they can last for up to 3-4 days. If you want to freeze them, wrap each individual wrap tightly in foil or plastic wrap before placing them in a freezer-safe bag. They’ll keep well for about a month!
Reheating
To reheat, preheat your oven to 350°F (175°C). Place the wraps directly on the oven rack or a baking sheet for about 10-15 minutes, ensuring they heat evenly. This method will help maintain that crispy exterior and gooey inside we all adore.
There you have it! Delicious Ooey-Gooey Cheesy Garlic Chicken Wraps that are super easy to make, budget-friendly, and loved by the family. So roll up your sleeves, head to the kitchen, and treat yourself and your loved ones to these delightful wraps! Enjoy cooking, and happy feasting!

Ooey-Gooey Cheesy Garlic Chicken Wraps
Ingredients
Method
- Preheat your oven to 375°F (190°C).
- In a large mixing bowl, combine the cooked chicken, mozzarella cheese, cheddar cheese, minced garlic, paprika, salt, and pepper. Stir until all ingredients are evenly mixed.
- Lay one tortilla flat on a clean surface. Spoon a generous amount of the chicken and cheese mixture onto the center of the tortilla. Fold in the edges and roll it tightly, securing the filling inside.
- Place the wrapped tortilla seam-side down on a baking sheet. Brush the tops with olive oil or melted butter for an extra crispy finish.
- Bake for about 20-25 minutes, or until the wraps are golden brown and cheese is melted.
- Remove the wraps from the oven and let them cool for a few minutes. Serve with your favorite dipping sauces like sour cream or salsa.
Leave a Reply