
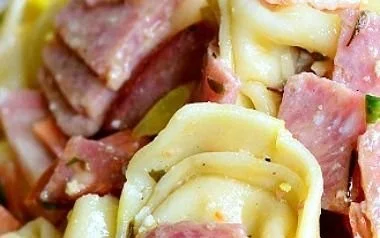
There’s something irresistibly delightful about an Italian Tortellini Pasta Salad that makes every gathering feel a bit more special. Imagine sinking your fork into tender, chewy tortellini filled with savory cheese and herbs, tossed together with crisp vegetables and a zesty Italian dressing that dances on your palate. This dish not only delivers on flavor but also showcases vibrant colors that visually appeal, making it a staple at family gatherings or cozy winter evenings. Fun fact: did you know that tortellini is said to be inspired by the shape of Venus’s belly button? Now that’s a conversation starter!
As you whip up this Italian Tortellini Pasta Salad, you’ll appreciate its simplicity and quick preparation—ideal for even the busiest of weeks. If you’ve enjoyed my Mediterranean Chickpea Salad before, you’ll find this recipe just as easy to make and equally delightful. Let’s dive in!
What is Italian Tortellini Pasta Salad?
So, what exactly is Italian Tortellini Pasta Salad? Well, let’s take a moment to ponder the name itself. Is it really pasta when it’s a salad? It’s a bit of both! This dish combines hearty tortellini with fresh veggies, allowing you to indulge in both flavor and nutrition—all in one bowl. You might say the way to a man’s heart is through his stomach, and that could easily apply here! Imagine bringing this colorful, delicious salad to your next family gathering and basking in the compliments that roll in. It’s almost too easy to make your loved ones swoon with just a simple recipe. Let’s whip up some of this goodness together!
Why You’ll Love This Italian Tortellini Pasta Salad
This Italian Tortellini Pasta Salad shines as a main dish that’s both hearty and refreshing. The combination of tortellini, fresh vegetables, and zesty dressing creates a harmonious blend of flavors that tantalizes your taste buds. Not only is cooking at home more cost-effective than dining out, but it also allows you to customize this dish to suit your family’s preferences. Imagine the crunch of fresh cucumbers and bell peppers, combined with the creamy texture of feta cheese—all enhanced by the bright flavor of fresh basil on top!
If you’ve loved the classic pasta salad, this recipe takes it up a notch with vibrant colors and textures that delight the senses. You’re going to want to save this recipe and make it a staple at your next gathering!
How to Make Italian Tortellini Pasta Salad
Quick Overview
Making Italian Tortellini Pasta Salad is not only easy but incredibly satisfying. In just about 30 minutes, you can whip up a dish that offers delightful flavors and textures, making it perfect for a light dinner or a side dish at gatherings. With gooey cheese-filled pasta and crunchy fresh vegetables, you won’t be able to get enough!
Ingredients for Italian Tortellini Pasta Salad
- 12 oz tortellini (any variety you enjoy)
- 1 cup cherry tomatoes (halved)
- 1 cucumber (diced)
- ½ red onion (thinly sliced)
- 1 bell pepper (diced, color of your choice)
- ½ cup black olives (sliced)
- 1 cup feta cheese (crumbled)
- ½ cup Italian dressing (ensure it’s halal-certified)
- ¼ cup Parmesan cheese (grated)
- Fresh basil leaves (for garnish)
Step-by-Step Instructions
- Cook the Tortellini: Bring a pot of water to a boil and cook the tortellini according to the package instructions. Usually, this takes about 3-5 minutes. Once cooked, drain and set aside to cool.
- Prepare the Vegetables: While the tortellini is cooking, chop up your cherry tomatoes, cucumber, bell pepper, and red onion. Aim for bite-sized pieces to make it easy to enjoy.
- Mix It Together: In a large mixing bowl, combine the cooled tortellini, chopped vegetables, black olives, and crumbled feta cheese. Remember to toss gently to ensure everything is well mixed.
- Dress It Up: Drizzle the Italian dressing over the pasta salad and sprinkle the grated Parmesan cheese on top. Toss everything together until the pasta and vegetables are evenly coated.
- Garnish and Serve: Finish with a sprinkle of fresh basil leaves for that extra burst of flavor. Your Italian Tortellini Pasta Salad is ready to be served!
Top Tips for Perfecting Italian Tortellini Pasta Salad
- Substitutions: Feel free to mix and match the vegetables based on what’s in season or what you have on hand. Spinach, kalamata olives, or even artichoke hearts work wonders in this salad.
- Timing: Allow the tortellini to cool completely before combining it with the dressing to avoid wilting the fresh veggies.
- Avoiding Common Mistakes: Be careful not to overcook the tortellini. They should be al dente. If they become too soft, they can break apart and make the salad mushy.
Storing and Reheating Tips
This Italian Tortellini Pasta Salad can be stored in an airtight container in the refrigerator for up to 3 days. To maintain the crispness of the vegetables, consider storing the dressing separately and combining it right before serving. Although this salad is best enjoyed fresh, if you do need to reheat it, a gentle toss in a skillet over low heat with a splash of olive oil can revive it beautifully—just be careful not to overheat, as it can alter the taste and texture. Enjoy every bite!

Now, gather your ingredients and treat your family to this delightful Italian Tortellini Pasta Salad—you’re sure to leave them asking for seconds!
Italian Tortellini Pasta Salad
Ingredients
Method
- Bring a pot of water to a boil and cook the tortellini according to the package instructions, usually about 3-5 minutes. Once cooked, drain and set aside to cool.
- While the tortellini is cooking, chop up your cherry tomatoes, cucumber, bell pepper, and red onion into bite-sized pieces.
- In a large mixing bowl, combine the cooled tortellini, chopped vegetables, black olives, and crumbled feta cheese. Toss gently to ensure everything is well mixed.
- Drizzle the Italian dressing over the pasta salad and sprinkle the grated Parmesan cheese on top. Toss everything together until the pasta and vegetables are evenly coated.
- Finish with a sprinkle of fresh basil leaves for extra flavor. Your Italian Tortellini Pasta Salad is ready to be served!
Leave a Reply