
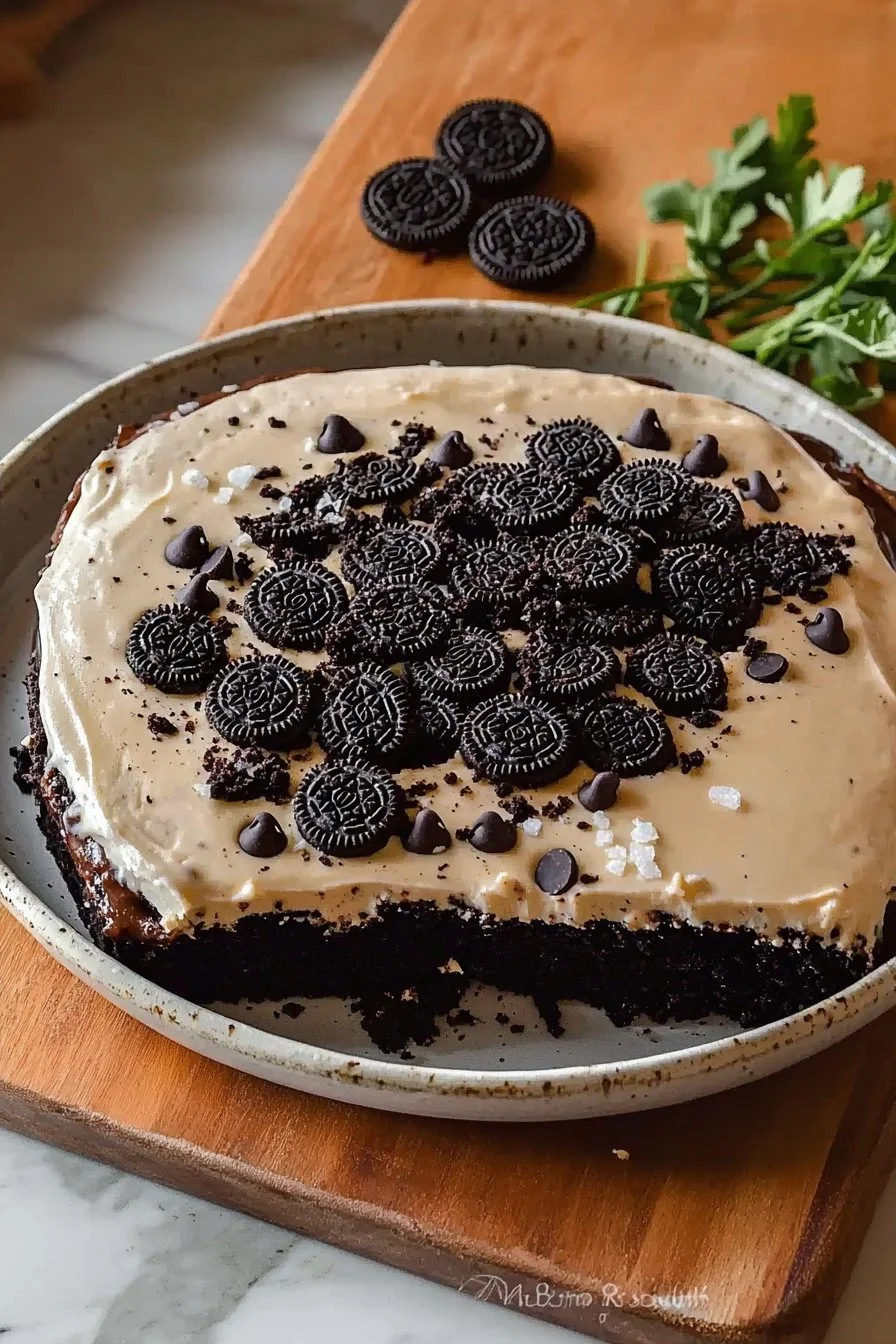
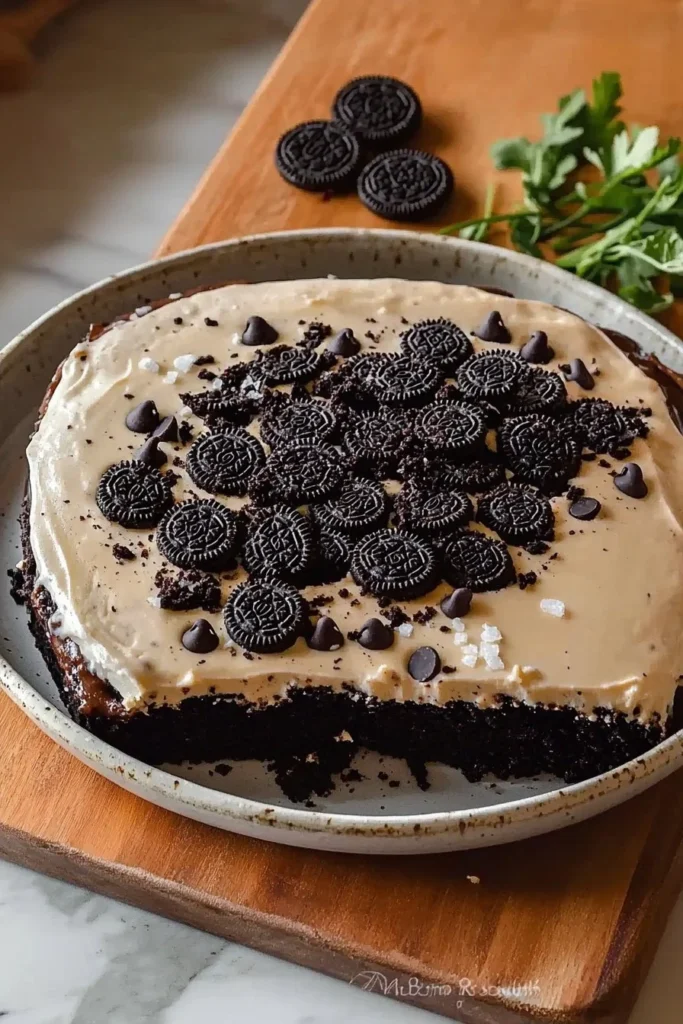
Homemade Oreo Biscuit Cake
There’s something undeniably delightful about a chocolatey dessert that combines sweetness with a hint of nostalgia. Enter the Homemade Oreo Biscuit Cake, a showstopper that will have your family gathering around for seconds! Imagine layers of creamy goodness intermingling with the iconic crunch of Oreos, creating a textured treat that is as pleasing to the eye as it is to the palate.
Did you know that the Oreo cookie was first introduced back in 1912? That’s over a century of chocolatey goodness! This dessert is not just another cake; it’s a canvas that welcomes personal touches like fresh fruit or festive sprinkles, making it perfect for family gatherings or cozy winter evenings. If you’ve enjoyed my popular No-Bake Chocolate Biscuit Cake, you’re in for a treat—this recipe amplifies the indulgence while keeping the preparation easy and engaging.
Get ready to impress your loved ones and rediscover the joy of homemade desserts with this simple yet stunning cake.
What is Homemade Oreo Biscuit Cake?
So, what exactly is a Homemade Oreo Biscuit Cake? Well, as the name suggests, it’s an irresistible cake made from Oreo biscuits, so wonderfully creamy that it feels almost like a fluffy cloud in your mouth! Have you ever thought about how this delicious creation got its quirky name? Perhaps it’s because it balances creamy texture with crispy bites of yummy Oreo!
And speaking of hearts, remember, the way to a man’s heart is through his stomach! Whip up this delightful dessert, and I guarantee it will earn you some serious brownie points (or should I say, cake points?). Ready to dive in? Grab those Oreos and let’s bake this cake!
Why You’ll Love This Homemade Oreo Biscuit Cake
This Homemade Oreo Biscuit Cake shines with its deliciously rich flavors and effortless preparation. Unlike traditional cakes, this one doesn’t require complicated baking skills or lengthy waiting times. Instead, you’ll get to layer deliciousness without even turning on the oven!
Not only does making this cake save you money compared to ordering desserts from a bakery, but it also allows for a unique personal touch. Want to add a dash of mint or maybe some crushed nuts? Go for it! You can customize the flavors and toppings to fit any palate. Picture chocolate chips melting into creamy goodness, playing alongside crunchy Oreos. Your taste buds are in for an adventure!
If you’ve enjoyed my Easy Chocolate Mousse Cake, you’ll love the flavor fiesta that this Homemade Oreo Biscuit Cake brings. Why wait? Make it for your next family gathering!
How to Make Homemade Oreo Biscuit Cake
Quick Overview
This Homemade Oreo Biscuit Cake is both easy and satisfying to prepare. You’ll love the combination of crispy Oreo layers contrasted with fluffy cream, making each bite a delightful experience! The preparation time is a breezy 30 minutes, with a little patience required for chilling time.
Ingredients
To make this delicious Homemade Oreo Biscuit Cake, you will need:
- 24 Oreo biscuits
- 1 cup heavy cream
- 1/2 cup cream cheese
- 1/4 cup powdered sugar
- 1 teaspoon vanilla extract
- 1/2 cup chocolate chips (optional)
Make sure to have everything ready for a smooth baking process!
Step-by-Step Instructions
- Prepare the Cream Mixture: In a mixing bowl, whip the heavy cream until it forms soft peaks. Then, in a separate bowl, combine the cream cheese and powdered sugar. Stir in the vanilla extract until smooth.
- Combine the Mixtures: Gently fold the whipped heavy cream into the cream cheese mixture until well blended. This creates a fluffy, light cream that will be the filling for your cake!
- Layer the Oreos: Take a plate or a cake stand and start layering Oreos. Dip each Oreo briefly in milk for moisture (Optional but adds a lovely soft texture). Begin by placing a single layer of Oreos on the bottom.
- Add Cream: Spread a generous amount of the cream mixture on top of the first layer of Oreos. Repeat this process, alternating layers of Oreos and cream until you’ve used up all your ingredients.
- Chill the Cake: Cover the cake with plastic wrap and chill in the refrigerator for at least 4 hours, or preferably overnight. This allows the flavors to meld beautifully.
- Serve and Enjoy: Once chilled, slice your cake and sprinkle chocolate chips on top or any other toppings of your choice before serving. You’re now ready to enjoy this delectable Homemade Oreo Biscuit Cake!
Top Tips for Perfecting Homemade Oreo Biscuit Cake
- Cream Substitutions: You can use plant-based cream alternatives for a dairy-free version of this cake. Coconut cream works wonderfully!
- Timing: Allow the cake to chill long enough to set properly. If you’re short on time, aim for at least 4 hours.
- Avoid Common Mistakes: Make sure not to overbeat the heavy cream. Stop mixing as soon as it reaches soft peaks to achieve that perfect fluffy texture!
Storing and Reheating Tips
This Homemade Oreo Biscuit Cake can be stored in the refrigerator for up to 3 days. Make sure to keep it covered to maintain its flavor and texture. If you want to save it for longer, consider freezing it. The cake can last up to a month in the freezer, but it’s best enjoyed fresh. When you’re ready to indulge, thaw it overnight in the refrigerator and enjoy the delightful texture as if it was just made!
Now that you have everything you need, it’s time to gather your ingredients and bring this mouthwatering Homemade Oreo Biscuit Cake to life. Your family and friends will love you even more for it—a little dessert happiness goes a long way!
With every bite of this delicious cake, you’re bound to create memories that will linger long after the last crumb is gone. Happy baking!
Homemade Oreo Biscuit Cake
Ingredients
Method
- In a mixing bowl, whip the heavy cream until it forms soft peaks.
- In a separate bowl, combine cream cheese and powdered sugar. Stir in vanilla extract until smooth.
- Gently fold the whipped heavy cream into the cream cheese mixture until well blended.
- Take a plate or a cake stand and start layering Oreos, dipping each briefly in milk for moisture.
- Spread a generous amount of the cream mixture on top of the first layer of Oreos. Repeat until all ingredients are used.
- Cover the cake with plastic wrap and chill in the refrigerator for at least 4 hours, or preferably overnight.
- Once chilled, slice the cake and sprinkle with chocolate chips or any topping of your choice.
Leave a Reply