
Welcome to the world of Chocolate Marble Cheesecake—a dessert that combines the best of both worlds with its rich, creamy texture and a delightful mix of chocolate and smooth cheesecake flavors. This dessert is not just about taste; it’s a visual feast as well, with its beautiful swirls of chocolate creating a stunning marbled effect. If you’re looking to impress your family or guests with something unique yet simple, this cheesecake is the perfect solution.
Did you know that cheesecake dates back to ancient Greece? It’s true! This beloved dessert has evolved through the years, with variations like this Chocolate Marble Cheesecake capturing hearts (and stomachs) worldwide. What makes this recipe so special is its simplicity and quick preparation time. With just a few ingredients and an uncomplicated recipe, you can whip up a treat that feels indulgent without the fuss. Your family will be asking for seconds, and you’ll be the star of your kitchen!
Not only does this recipe satisfy your sweet tooth, but it also stands out among other favorite desserts on the blog, like our classic vanilla cheesecake. Whether you’re a seasoned baker or a bener, this Chocolate Marble Cheesecake invites you to bring the family together and dive into the delicious world of homemade desserts. So roll up your sleeves, grab your mixing bowl, and let’s dive into making this creamy delight!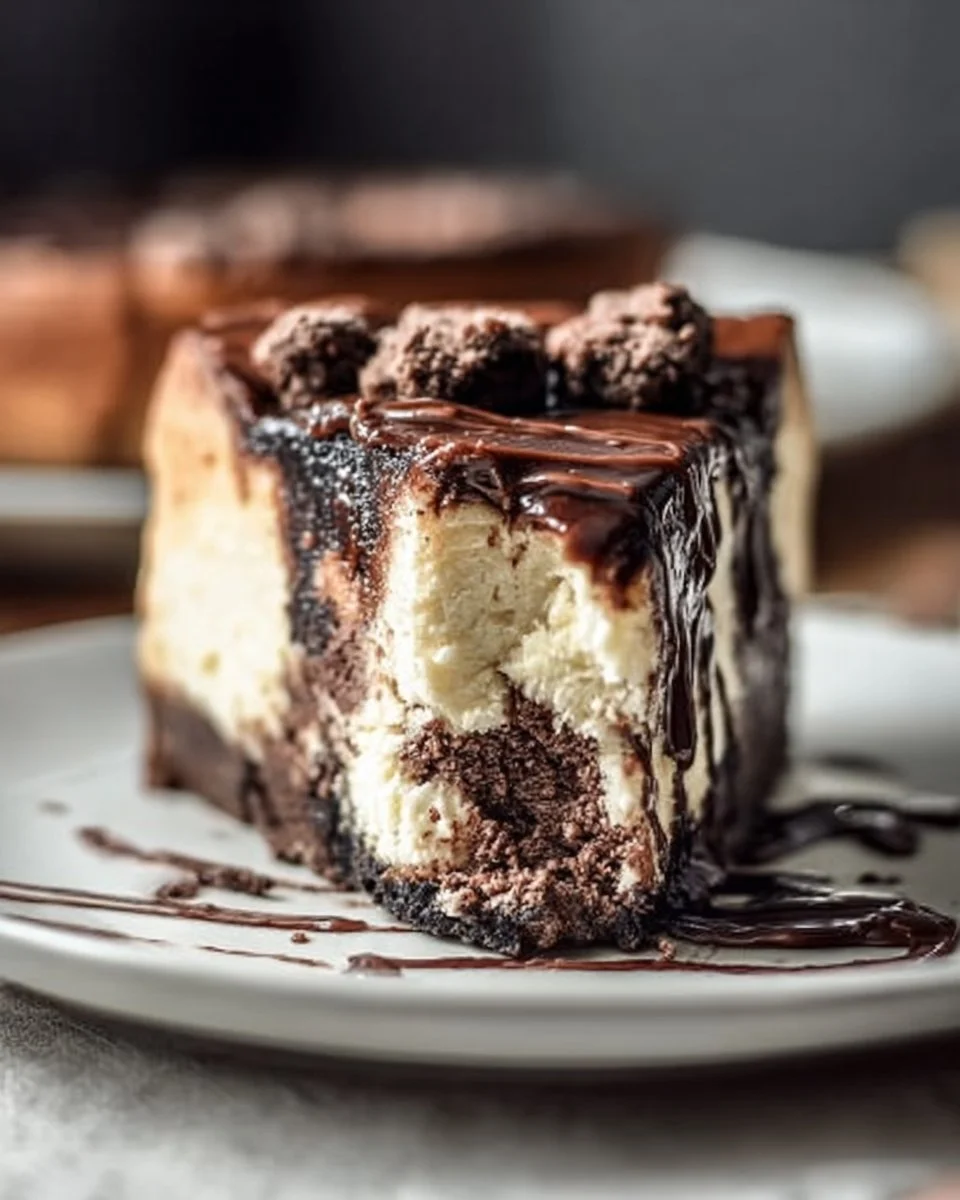
What is Chocolate Marble Cheesecake?
You might be wondering, “What on earth is Chocolate Marble Cheesecake?” Ah, it’s a heavenly blend of two favorites—rich chocolate and smooth cheesecake. This delightful dessert isn’t just a treat for your taste buds but also a charming visual presentation that’ll impress anyone who lays eyes on it. It’s like asking, why is a giraffe so tall? One might say, “To reach the tastiest leaves!” The secrets behind the name combine layers of creamy cheesecake with decadent swirls of chocolate, ensuring you get a bit of both in every bite. And as they say, “the way to one’s heart is through their stomach” — after indulg in this dessert, you might just find love at first bite!
Are you ready to jump in and create a show-stopping Chocolate Marble Cheesecake? Trust me, you won’t regret it!
Why You’ll Love This Chocolate Marble Cheesecake
There are three key aspects that make Chocolate Marble Cheesecake a must-try dessert. First and foremost is its creamy texture and rich flavor profile that makes each slice a slice of heaven. Elegant swirls of chocolate through a velvety cheesecake filling create a flavor explosion that dances on your palate.
Secondly, making this cheesecake at home is budget-friendly! Why buy a slice at the bakery when you can create a whole cheesecake for the price of just a few slices? It’s a fantastic way to treat your family or yourself without breaking the bank.
Finally, the versatility of this cheesecake allows for delightful toppings. Consider adding fresh berries, chocolate shavings, or a drizzle of caramel or chocolate sauce to elevate the experience. It’s also worth comparing to other delicious desserts, like a classic fruit tart, which offers a different flavor profile yet equally captivates with its beauty. Why not try making both for a sweet conclusion to your meal? I guarantee you’ll want a slice (or two) of this amazing Chocolate Marble Cheesecake!
How to Make Chocolate Marble Cheesecake
Quick Overview
You’re just moments away from creating a Chocolate Marble Cheesecake that is both easy and delicious. This dessert features a buttery gra cracker crust, a creamy cheesecake filling, and luscious swirls of chocolate. With just a little bit of prep and a bit of patience while it sets in the fridge, you’ll have a stunning cheesecake that’s ready to be savored. Preparation takes about 20 minutes, and baking will require just a little more time, making this an accessible treat for any home baker!
Key Ingredients for Chocolate Marble Cheesecake
To whip up this dreamy dessert, here’s what you’ll need:
- For the crust:
- 1 ½ cups gra cracker cbs
- ⅓ cup melted butter
- ¼ cup sugar
- For the filling:
- 16 ounces cream cheese, softened
- 1 cup sugar
- 3 large eggs
- 1 teaspoon vanilla extract
- ½ cup sour cream
- ⅔ cup semisweet chocolate chips, melted
Step-by-Step Instructions
- Preheat the oven to 325°F (160°C). Prepare a 9-inch springform pan by greasing the bottom and sides lightly.
- Make the crust: In a medium-sized bowl, mix the gra cracker cbs, melted butter, and sugar until combined. Press the mixture firmly into the bottom of the prepared pan. Bake for 8-10 minutes, or until lightly browned. Remove from the oven and set aside to cool.
- Prepare the filling: In a large mixing bowl, beat the softened cream cheese with sugar until smooth using an electric mixer. Add the eggs, one at a time, mixing on low speed after each addition until just combined. Then, stir in the vanilla extract and sour cream until smooth and fluffy.
- Add the chocolate: Take about 1 cup of the cheesecake batter and mix it with the melted chocolate until it’s well combined.
- Layer the batter: Pour half of the plain cheesecake batter into the prepared crust. Then, drop spoonfuls of the chocolate mixture on top. Continue layering with the remaining plain and chocolate batters, swirling them together gently with a knife for a marbled effect.
- Bake in the preheated oven for 50-60 minutes, or until the cheesecake is set around the edges but slightly jiggly in the center. Turn off the oven and leave the cheesecake inside with the oven door slightly open for 1 hour to cool.
- Chill: After cooling, refrigerate the cheesecake for at least 4 hours, preferably overnight, before serving to allow the flavors to meld perfectly.
Top Tips for Perfecting Chocolate Marble Cheesecake
To make the most outstanding Chocolate Marble Cheesecake, here are some handy tips:
- Use room temperature ingredients: Allow your cream cheese and eggs to come to room temperature. This will ensure a smooth, lump-free batter.
- Don’t overmix the batter: Mixing just until combined helps prevent too much air from getting in, which can cause cracks in your cheesecake.
- Use quality chocolate: High-quality chocolate chips make all the difference in flavor.
Storing and Reheating Tips
If you happen to have leftovers, great job—but remember that this cheesecake is best enjoyed fresh! To store, simply cover the cheesecake with plastic wrap or transfer it to an airtight container. It will stay fresh in the refrigerator for up to a week. If you want to savor it later, you can also freeze individual slices by wrapping them in plastic wrap and placing them in an airtight container. Just make sure to let them thaw overnight in the fridge before enjoying!
With its rich layers and velvety finish, this Chocolate Marble Cheesecake is not only simple to make but also a surefire way to tantalize your taste buds. So why wait? Gather your ingredients, get baking, and treat yourself to a slice of heaven!

Chocolate Marble Cheesecake
Ingredients
Method
- Preheat the oven to 325°F (160°C). Prepare a 9-inch springform pan by greasing the bottom and sides lightly.
- In a medium-sized bowl, mix the gra cracker cbs, melted butter, and sugar until combined. Press the mixture firmly into the bottom of the prepared pan. Bake for 8-10 minutes, or until lightly browned. Remove from the oven and set aside to cool.
- In a large mixing bowl, beat the softened cream cheese with sugar until smooth using an electric mixer. Add the eggs, one at a time, mixing on low speed after each addition until just combined. Then, stir in the vanilla extract and sour cream until smooth and fluffy.
- Take about 1 cup of the cheesecake batter and mix it with the melted chocolate until it’s well combined.
- Pour half of the plain cheesecake batter into the prepared crust. Drop spoonfuls of the chocolate mixture on top. Continue layering with the remaining plain and chocolate batters, swirling them together gently with a knife for a marbled effect.
- Bake in the preheated oven for 50-60 minutes, or until the cheesecake is set around the edges but slightly jiggly in the center. Turn off the oven and leave the cheesecake inside with the oven door slightly open for 1 hour to cool.
- After cooling, refrigerate the cheesecake for at least 4 hours, preferably overnight, before serving to allow the flavors to meld perfectly.
Leave a Reply