
Are you ready to indulge in a dessert that’s as delightful to the palate as it is pleasing to the eye? Look no further than these Heavenly Cherry Pistachio Cheesecake Bars! Imae sinking your fork into creamy cheesecake layered over a crunchy pistachio crust, topped with the vibrant sweetness of cherries. It’s a harmonious blend of flavors and textures that is sure to impress family and friends alike.
Quick to prepare and easy to serve, these cheesecake bars are perfect for any occasion—whether it’s a casual weekend treat or a gathering with loved ones. Did you know that cheesecakes date back to ancient Greece? They’ve come a long way since then, but the spirit of indulgence remains the same! If you love desserts like our decadent Chocolate Swirl Brownies found elsewhere on the blog, you’re sure to adore these bars. Let’s dive into this delectable recipe, and soon you’ll be counting down to dessert!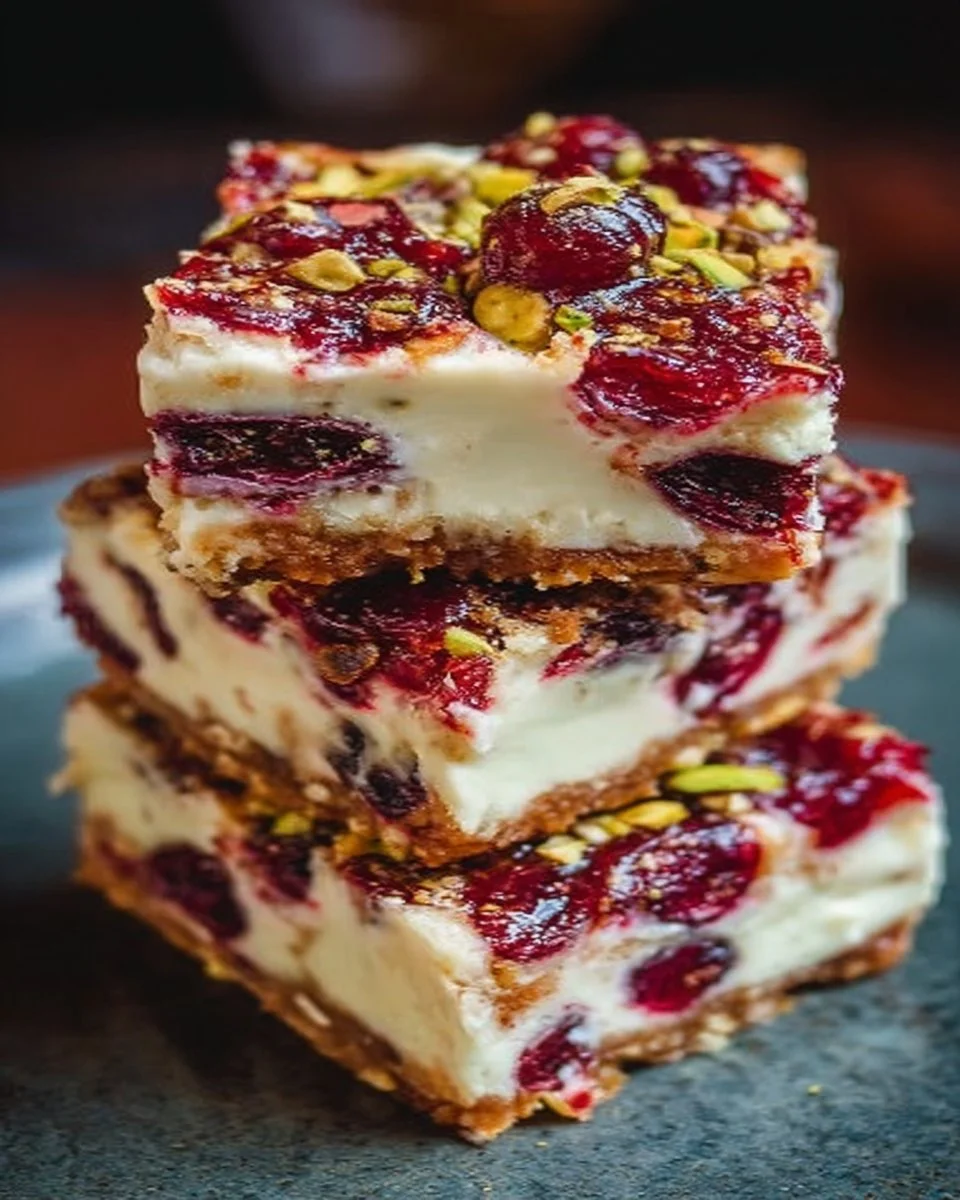
What are Heavenly Cherry Pistachio Cheesecake Bars?
So, what’s in a name? When you hear Heavenly Cherry Pistachio Cheesecake Bars, you might be picturing a cloud of creamy goodness topped with cherry-red jewels and green pistachio bits. It’s almost too pretty to eat, right? With a name that boasts heavenly delights and a crunchy twist, these bars could make anyone weak at the knees. Legend has it that the name oriated from a delightful bake-off between friends, eager to impress one another! And we all know the classic saying, “the way to a man’s heart is through his stomach”—these bars might just do the trick. Ready to whip up your own batch of heavenly goodness? Let’s get started!
Why You’ll Love These Heavenly Cherry Pistachio Cheesecake Bars
These Heavenly Cherry Pistachio Cheesecake Bars have it all—flavor, texture, and a homey appeal that’s hard to resist! First off, the creamy cheesecake filling steals the show, providing a cozy base that contrasts beautifully with the crunchy pistachio crust. Just picture biting into that smooth cheesecake while the nutty crust cbles beneath!
Additionally, making these bars at home is a fantastic way to save money without sacrificing flavor. Why settle for store-bought when you can create a mini masterpiece in your own kitchen? And let’s not forget the star of the show: the vibrant cherries! Their tartness cuts through the richness, making each bite a delightful balance of flavors.
If you’re a fan of rich desserts like our classic Vanilla Bean Panna Cotta, you won’t want to miss these cheesecake bars! Roll up your sleeves and let’s treat ourselves!
How to Make Heavenly Cherry Pistachio Cheesecake Bars
Quick Overview
Creating these cheesecake bars is a breeze! From the nutty crust to the creamy filling, you’ll be done in no time. Preparation takes about 20 minutes, followed by chilling time for the perfect set. The ultimate showstopper, these bars combine rich textures and vibrant flavors and are bound to satisfy your sweet cravings.
Key Ingredients for Heavenly Cherry Pistachio Cheesecake Bars
- For the Pistachio Crust:
- 1 ½ cups pistachio nuts, finely ground
- ½ cup unsalted butter, melted
- 2 tablespoons sugar
- 1/4 teaspoon salt
- For the Cheesecake Filling:
- 16 oz cream cheese, softened
- 1 cup granulated sugar
- 1 teaspoon vanilla extract
- 3 large eggs
- Zest of one lemon
- For the Cherry Topping:
- 2 cups fresh or frozen cherries, pitted
- 2 tablespoons sugar
- 1 tablespoon lemon juice
- 1 tablespoon cornstarch
Step-by-Step Instructions
- Preheat the Oven: Start by preheating your oven to 350°F (175°C).
- Make the Pistachio Crust: In a mixing bowl, combine the finely ground pistachios, melted butter, sugar, and salt. Stir until the mixture is fully combined. Press the mixture firmly into the bottom of a greased 9×9-inch baking pan. Bake for 10 minutes, then let it cool while you prepare the filling.
- Prepare the Cheesecake Filling: In a large mixing bowl, beat the softened cream cheese with a hand mixer until smooth. Gradually add the sugar and blend until creamy. Add the vanilla extract, eggs (one at a time), and lemon zest, mixing just until combined.
- Bake the Cheesecake: Pour the cheesecake filling over the cooled pistachio crust. Bake for 25–30 minutes or until the edges are set and the center is slightly jiggly. Allow the bars to cool at room temperature before refrigerating for at least 4 hours, or overnight for best results.
- Create the Cherry Topping: In a saucepan over medium heat, combine the cherries, sugar, lemon juice, and cornstarch. Stir together until the cherries are softened and create a syrup. Let it cool to room temperature.
- Assemble and Serve: Once the cheesecake is set, pour the cherry topping over the bars, slice them into squares, and serve. Enjoy the heavenly flavors!
What to Serve Heavenly Cherry Pistachio Cheesecake Bars With
These luscious dessert bars can stand alone as the star of any meal or gathering, but they pair beautifully with a variety of sides and drinks. Consider serving them with:
- Fresh Whipped Cream: A dollop adds an extra creamy touch.
- Mint Leaves: Fresh mint can elevate the presentation and enhance the flavor.
- Iced Tea or Lemonade: A refreshing drink complements the sweet and tart flavors of the cheesecake bars.
Top Tips for Perfecting Heavenly Cherry Pistachio Cheesecake Bars
- Use Room Temperature Ingredients: Ensure your cream cheese is softened for easy mixing and a smooth texture.
- Don’t Overmix: When combining the filling ingredients, mix just until combined to prevent cracks in the cheesecake.
- Substitutions: Feel free to swap the cherries for fresh strawberries or blueberries for a fun twist!
- Chill Properly: Allow ample time in the fridge to help firm up the cheesecake bars.
Storing and Reheating Tips
Store any leftovers in an airtight container in the refrigerator, where they should stay fresh for up to five days. If you want to keep them longer, you can freeze them for up to three months. To reheat, simply thaw in the refrigerator overnight and enjoy cold or allow them to sit at room temperature for about 30 minutes.
In closing, these Heavenly Cherry Pistachio Cheesecake Bars are not just a treat; they’re a celebration of flavor that you can easily recreate at home. With their creamy filling, crunchy pistachio crust, and sweet cherry topping, they’re sure to become a favorite at your table. So why wait? Grab your baking essentials and make these heavenly bars today! Happy baking!
Heavenly Cherry Pistachio Cheesecake Bars
Ingredients
Method
- Preheat your oven to 350°F (175°C).
- In a mixing bowl, combine the finely ground pistachios, melted butter, sugar, and salt. Stir until fully combined.
- Press the mixture firmly into the bottom of a greased 9×9-inch baking pan. Bake for 10 minutes and let cool.
- In a large mixing bowl, beat the softened cream cheese with a hand mixer until smooth. Gradually add the sugar and blend until creamy.
- Add the vanilla extract, eggs one at a time, and lemon zest, mixing just until combined.
- Pour the cheesecake filling over the cooled pistachio crust and bake for 25–30 minutes until the edges are set and the center is slightly jiggly.
- Allow the bars to cool at room temperature, then refrigerate for at least 4 hours or overnight.
- In a saucepan over medium heat, combine the cherries, sugar, lemon juice, and cornstarch. Stir until softened and syrup is created. Let it cool.
- Once the cheesecake is set, pour the cherry topping over the bars, slice into squares, and serve.
Leave a Reply