
Who doesn’t love a sweet treat that’s easy to make and satisfies all your chocolate cravings? Enter Butterfinger Balls! These delightful, no-bake confections combine the rich, creamy flavor of peanut butter with the satisfying crunch of crushed Butterfinger candy bars, all coated in creamy chocolate. They’re perfect for sharing at gatherings or indulg in as a personal treat after a long day.
Did you know that Butterfinger candy bars were first introduced in 1923? That’s nearly a century of deliciousness! The fun and unique crunch of Butterfinger bars lends itself beautifully to this quick and simple recipe, which can be whipped up in no time. If you’ve ever made favorite treats like chocolate-covered pretzels, you’ll find Butterfinger Balls just as rewarding, but with an even greater flavor pay-off. So gather your ingredients, and let’s dive into the delightful world of Butterfinger Balls!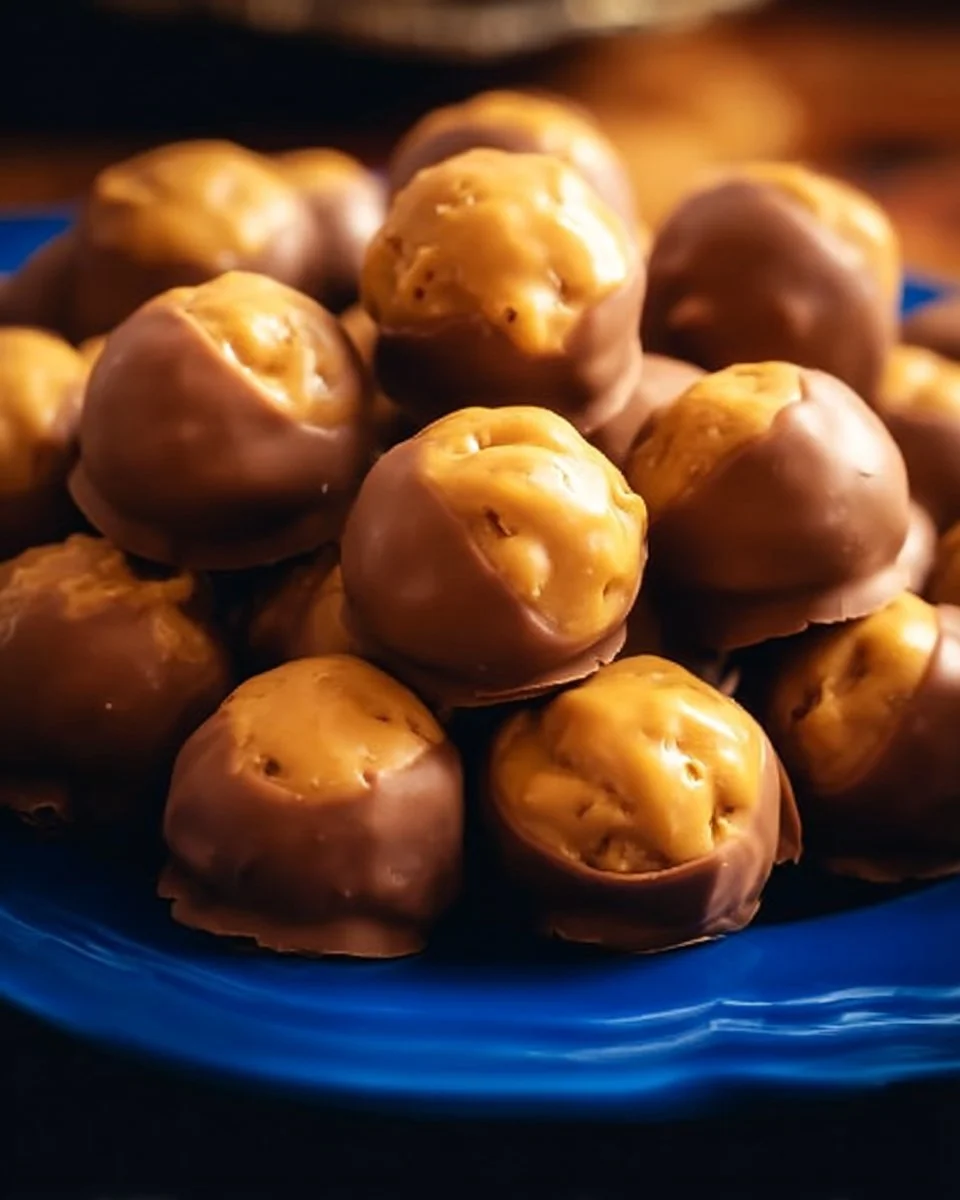
What Are Butterfinger Balls?
Let’s take a moment to appreciate the quirky name of these goodies: Butterfinger Balls. Isn’t it fun to say? It both rolls off the tongue and evokes the sheer bliss of biting into one. But have you ever wondered why they’re called Butterfinger Balls? The name is all about that iconic Butterfinger candy bar, famous for its combination of crunchy peanut butter and chocolate. And the “balls” part? Well, isn’t it satisfying to roll a sweet mixture into perfect little orbs? After all, ‘the way to a man’s heart is through his stomach,’ and these little bites of happiness are bound to win hearts.
So if you enjoy a sweet that’s fun, easy to make, and utterly delicious, get ready to try Butterfinger Balls!
Why You’ll Love This Butterfinger Balls Recipe
You’re going to love Butterfinger Balls for several reasons! First, they bring together the irresistible flavor of chocolate and peanut butter with that crunchy Butterfinger goodness. You can’t go wrong with this combination! Second, making Butterfinger Balls is incredibly budget-friendly. With just a few ingredients, you can whip up a batch that will impress your family and friends without breaking the bank.
Plus, who can resist a treat that requires no baking? Quickly formed and dipped in chocolate, these sweets are not just fun to make but also incredibly satisfying to eat. If you love other sweet treats like chocolate-covered coconut balls, we encourage you to explore Butterfinger Balls for a delightful twist. So go ahead, gather your ingredients, and let’s get making them at home!
How to Make Butterfinger Balls
Quick Overview
Making Butterfinger Balls is an easy and quick process that requires no baking. In about 30 minutes, you can have these delectable bites ready! With their creamy peanut butter filling, crunchy Butterfinger pieces, and a smooth chocolate coating, each bite will tantalize your taste buds.
Key Ingredients for Butterfinger Balls
Here’s what you’ll need to create these delectable treats:
- 1 cup creamy peanut butter
- 3 cups crushed Butterfinger candy bars (approximately 5-6 bars)
- 2 cups powdered sugar
- 1 teaspoon vanilla extract
- 1 cup chocolate chips (for melting)
- 2 tablespoons of vegetable oil (for thinning chocolate)
Step-by-Step Instructions
Let’s break down the steps to make your own Butterfinger Balls:
- Mix the Filling: In a mixing bowl, combine the creamy peanut butter and powdered sugar. Stir with a spatula until smooth and well-combined.
- Add Butterfingers: Gently fold in the crushed Butterfinger pieces and vanilla extract until everything is evenly mixed.
- Form the Balls: Using your hands, take a small amount of the mixture and roll it into a ball about the size of a walnut. Repeat until all the mixture is rolled into balls and place them on a parchment-lined baking sheet.
- Chill: Cover the baking sheet and refrigerate the balls for about 30 minutes, allowing them to firm up.
- Melt Chocolate: While the balls are chilling, melt the chocolate chips with the vegetable oil in a microwave-safe bowl. Heat in short intervals, stirring until smooth.
- Coat the Balls: Dip each chilled ball into the melted chocolate, making sure it’s fully coated. Use a fork to remove excess chocolate and place it back on the parchment sheet.
- Set and Enjoy: Allow the chocolate to harden at room temperature or place the tray back in the fridge for quicker setting. Once set, it’s time to enjoy your Butterfinger Balls!
What to Serve Butterfinger Balls With
Butterfinger Balls are a treat on their own, but why not enhance the experience? Pair these delectable bites with a glass of cold milk or a warm cup of coffee to balance the sweetness. You can also complement them with fresh fruit, like strawberries or bananas, for a delightful contrast in flavors. If you’re feeling adventurous, consider offering a variety of similar treats, such as chocolate-dipped pretzels or cookie dough bites, to create an exciting treat platter to share with family and friends.
Top Tips for Perfecting Butterfinger Balls
To help you achieve the best Butterfinger Balls, here are some practical tips:
- Room Temperature Ingredients: Make sure your peanut butter is at room temperature for easy mixing — it will make a difference!
- Chill Thoroughly: Don’t skip the chilling step before dipping in chocolate. It helps the balls maintain their shape and makes dipping easier.
- Smooth Chocolate Coating: Adding vegetable oil to the melted chocolate helps achieve a smoother coating and prevents it from cracking as it sets.
- Experiment with Coatings: While milk chocolate is classic, feel free to get creative! Try dark chocolate for a richer flavor or white chocolate for a fun twist.
Storing and Reheating Tips
To keep your Butterfinger Balls fresh and delicious, store them in an airtight container in the refrigerator. They will stay good for up to a week this way. If you prefer to keep them for longer, consider freezing them. Just place the balls in a single layer on a baking sheet, freeze until solid, and then transfer them to a freezer-safe bag. They can last for up to two months in the freezer. When you’re ready to enjoy, simply take them out and let them thaw at room temperature, or pop them into the microwave for a few seconds for a quick warm-up.
So there you have it—delicious Butterfinger Balls that are sure to be a family favorite! Whether you’re making them for yourself, your loved ones, or for a special occasion, these treats are simple, satisfying, and irresistibly tasty. Enjoy making and indulg in these sweet bites!
Butterfinger Balls
Ingredients
Method
- In a mixing bowl, combine the creamy peanut butter and powdered sugar. Stir with a spatula until smooth and well-combined.
- Gently fold in the crushed Butterfinger pieces and vanilla extract until everything is evenly mixed.
- Using your hands, take a small amount of the mixture and roll it into a ball about the size of a walnut. Repeat until all the mixture is rolled into balls and place them on a parchment-lined baking sheet.
- Cover the baking sheet and refrigerate the balls for about 30 minutes, allowing them to firm up.
- While the balls are chilling, melt the chocolate chips with the vegetable oil in a microwave-safe bowl. Heat in short intervals, stirring until smooth.
- Dip each chilled ball into the melted chocolate, making sure it’s fully coated. Use a fork to remove excess chocolate and place it back on the parchment sheet.
- Allow the chocolate to harden at room temperature or place the tray back in the fridge for quicker setting.
- Once set, enjoy your Butterfinger Balls!
Leave a Reply